Showing posts with label Mash. Show all posts

Saturday, December 1, 2012

ABC's of Nail Art Challenge: L is for... Laughter - Sinful Colors Unicorn and Stamping With Mash 31

       Today's post is for the Facebook group, Llama Nails.  Each week we do a manicure that coincides with each letter of the alphabet.  A is for apple, B is for baby, C is for cat, and so on, and so on.  This week we are on the letter L.  I was going to do love, but the mani that I did, didn't turn out at all like I wanted to.  I was going to redo the mani, but we went to a comedy show on Thursday night and it dawned on me, L is for laughter.  I wasn't quite sure how I was going to use the Mash 31 plate, and this became the perfect opportunity.
     Unicorn is a really pretty light yellow that requires three coats.  It is a pretty streaky formula which required the third coat to be a little thicker.  The outdoor pictures show Unicorn a little lighter than it is, and the indoor picture shows it darker than it is.  The accurate color is in between these.

Base coat: Diamond Strength Hardener
Base color: Unicorn from Sinful Colors - 3 coats
Top coat: Seche Vite (I applied this over Unicorn to dry it quickly so I could stamp over it).
Stamping images: Mash plate 31
Stamping color: Stamp Me! Black from Essence
Top coat: Sally Hansen Insa-Dri Anti-Chip Top Coat


Outdoor without flash


Indoor without flash

What do you guys think?  I hope you like it.

You can check out these other L related mani's using the links below.


Tuesday, November 27, 2012

Sinful Colors Athens and Olympia and Stamping With Mash 45

       Happy Tuesday evening everyone.  Or if you are over on the East Coast I'm sure it is much later.  I won't rub in the fact that I am enjoying a nice cup of coffee at the moment.  Mmmmm.  Coffee.  I.  Love.  Coffee.  OK, now onto the more important things in life, my nails!  When I first saw this image on the Mash 45 plate, I was not to keen on it, but after seeing a few people use it, I wanted to try it out.  I will say that I really enjoy how this turned out.  It is a little splotchy in spots, but that is because I wasn't using "real" stamping polishes, but I think these turned out pretty good considering the fact.

Base coat: Sally Hansen Triple Strong Advanced Nail Gel Fortifier
Base colors: Accent nail: Athens from Sinful Colors - 2 coats.
                     Olympia from Sinful Colors - 2 coats
Stamping plate: Mash 45
Stamping colors: Same as the base colors
Top coat: Seche Vite

These were taken inside without the flash.


Have you guys tried this stamp before?  If so, did you like it?  If you haven't tried it yet, would you?  I look forward to hearing from you!  I'm off to enjoy the rest of my coffee and start a new mani!  Have a great night.


Sunday, November 25, 2012

Stamping With Mash 42 Over Sinful Colors Gradient

       Happy Sunday everyone!  I am typing this with one hand because I have a baby on my lap!  But it is OK, because he is the cutest baby on the face of the earth, and my best friends baby.  Although, I'm sure mine will be cuter. ;-)  Today's post is for the Facebook group, Adventures In Stamping.  Each week we vote on a challenge, and this week the challenge is for us to stamp over a blue base.  I decided I wanted to do a blue gradient and it turned out beautifully.
     I also thought today would be a great way to use some of my whites that I haven't tried stamping with, to see how they worked.  We get a lot of questions referring to cheaper polishes to stamp within the group, and I figured my left hand would be a great way to kill two birds with one stone.  As you will see, my cleanup is terrible with my non dominant hand, and I'm also hiding a brutal hangnail.  It is so brutal, I couldn't even apply acetone to it to clean it up.  :-(  Winter is so harsh on my hands!

Base coat: Sally Hansen Triple Strong Advanced Gel Nail Fortifier
Base color: Cinderella from Sinful Colors - 2 coats
Gradient colors: Cinderella, Why Not, and Hot Spot from Sinful Colors
Topcoats: Sally Hansen Insta-Dri Anti-Chip Top Coat and Essence Gel Like Top Coat
Stamping colors: Stamp Me! White from Essence, White On The Spot from Milani, and Superstar! from Pure Ice
Stamping image: Mash 42

This picture was taken outside.  All stamping is done with Stamp Me! White from Essence


This picture was taken inside without flash.  All stamping was done with Stamp Me! White from Essence.


This picture was taken inside without flash.  Stamping was done with White On The Spot from Milani on the pointer and ring finger, and Superstar! from Pure Ice on the middle and pinky finger.


This picture was taken outside and stamping is done as described above the previous picture.


As you can see, the difference is pretty dramatic between the three whites I stamped with.  I will keep using the stamping polish from Essence, unless I can find something better.  I know the last two pictures look fuzzy, but it is actually the stamping that is making them look fuzzy. :-(  Crazy, huh.


Friday, November 23, 2012

ABC Nail Art Challenge: K is for...Keyboard

       Happy Friday everyone.  I hope that everyone that celebrates Thanksgiving had a great day.  My husband and I went over to my aunt's house, enjoyed some yummy food, and then went over to our friend's house to lie on their couch and relax.  :-)
     Today's blog post is another installment in the ABC nail art challenge that is being hosted by the Facebook group, Llama Nails.  I wasn't sure what I was going to do for the letter K, but I remembered seeing someone using a stamping plate that I owned that had a keyboard on it.  I'm so glad I saw someone use this image because ever since I received this set of plates, I have been wondering what the hell this image was.  I was pretty impatient when I did this mani, and you can see it in quality of this one.  Not one of my best ones.  :-(  Now I know for next time.

Base coat: Sally Hansen Triple Strong Advanced Gel Nail Fortifier
Base color's: Black Creme from Wet N' Wild - 1 coat, Superstar! from Pure Ice - 3 coats
Stamping plate: Mash 44
Stamping color's: Stamp Me! White and Stamp Me! Black from Essence
Top coat: Seche Vite


What do you guys think?


Monday, November 12, 2012

Stamping With Mash Plate 49 Over Avon Strawberry Polish, and Black Shatter from OPI

       Happy Monday everyone.  Let me just be honest and say that I am so glad it is a new week.  Last week sucked ass!  I had PMS all week and on top of that came down with Strep Throat!  I am sure that my PMS was on high from the Strep, too.  We spent all of our grocery money on the doctors visit, but oh well.  What can you do.  Looks like we will be on a steady diet of what ever is in our pantry, which isn't much!  Won't be the first time we've had to do this, and I'm sure it won't be the last.  
     Today was the first day I have had energy since Thursday.  I went to bed at 4 on Thurdsday and slep until I went to work at 5, worked a half day on Saturday, went home sick, noticed my throat was white, went to the doctor and then slept. I was so mad that I had to miss the Monster Truck show.  My parents pre bought my husband and me tickets since we couldn't afford them, and it was the first year in five years that I didn't have to work this particular event.  Imagine my anger.  Good thing I was too tired to do anything about it.
     Enough about my crap weekend.  On to the more important things in life, my nails!  I saw this mani that Valiantly Varnished did I was so excited to use it.  As I was looking through my polishes the other day I almost threw out my crackle because let's face it, no one uses them anymore.  But her mani did and i fell in love with it.  I am going to play around with this idea until I finish off my bottle of crackle, so weather or not you like this mani, be prepared to see some more like this. :-)  I hadn't used my crackle in so long that I actually had to use thinner in it!  And yes, it works just fine.

Base coat: Sally Hansen Triple Strong Advanced Gel Nail Fortifier
Base color: Strawberry from Avon - 1 coat
Crackle: Black Shatter from OPI
Stamping color: Stamp Me! White from Essence
Stamping plate: Mash 49
Top coat: Sally Hansen Insta-Dri Anti-Chip Top Coat


What do you guys think?  Still hate crackle or could you wear something like this?


Thursday, November 8, 2012

Llama Nails Presents the ABC's of Nails : I (And Stamping With Mash 30 Plate)

     Happy Thursday everyone!  How has everyone's week been so far?  Mine has been a little all over the map, hence not posting since Sunday!  What the heck man!  Well I missed the post for last week, which was H, but don't worry, I did it.  I will most likely be posting it tomorrow.  "I" was a tricky letter for me, (aren't they all) but as I was in the shower saying igloo, irritated, irate, intimate, and then icicle I stumbled upon Ireland!  Now that was something I could do on my nails.
     I finally picked up some more Seche Vite Top Coat the other day and I can't believe the difference it makes in dry time on my manicures.  When I have wanted to stamp before I usually have to wait 30 minutes to an hour before I can stamp it. With one coat of Seche on I can stamp after ten minutes, tops.  I don't think I will ever go without.

Base coat: Sally Hansen Advanced Gel Nail Fortifier
Base colors: Pinky, thumb, and ring finger - Superstar from Pure Ice - 2 coats
                     Middle finger: Pretty Edgy from Essie - 2 coats
                     Forefinger: Clementine from Sinful Colors - 2 coats
Stamping colors: Pinky - Heat Flash from Sally Hansen Insta-Dri
                            Middle - Stamp Me White from Essence and Khloe Had a Little Lam-Lam from Nicole by OPI
                            Forefinger - Stamp Me White from Essence
Flage colors: Clementine from Sinful Colors and Pretty Edgy from Essie applied with a striping brust
Image plate: Mash 30
Top coat: Seche Vite

These were taken outside in indirect light


Here are some other "I" inspired manicures!


Sunday, November 4, 2012

AIS: Stamping With Mash Plate 41

       Happy Sunday all.  I hope that you are all enjoying your extra hour of sleep.  I haven't participated in one of Sunday's Stamping Challenges in the Facebook group Adventures In Stamping in a few weeks now.  Today's challenge was for us to stamp over glitter.  When I was playing with some of my new polishes last night I came up with this color combination and was very excited to try it out.  It turned out a lot better in my head, but I still really like it.  I hope you do as well.

Base coat: PVA Glue - If you're not sure what I am referring to, you can check out my blog post about it here.
Base color: Skull and Glossbones from OPI - 2 coats
Accent color: Luxe Lavender from Avon - 2 coats
Glitter: Cheatin from Pure Ice - 1 coat
Top coat: Sally Hansen Insta-Dri Anti-Chip Top Coat
Stamping plate: Mash 41
Stamping color: Stamp Me! White and Stamp Me! Black from Essence


This photo was taken inside with the flash


This was taken outside without the flash


Skull and Glossbones is slowly becoming one of my favorite polishes!  I really like the white over the purple.  I think next time I will use all white instead of the black over the glitter and Skull and Glossbones.

Sunday, October 21, 2012

AIS: Halloween - Stamping With Mash Plates 48 and 29 Over OPI Skull and Glossbones

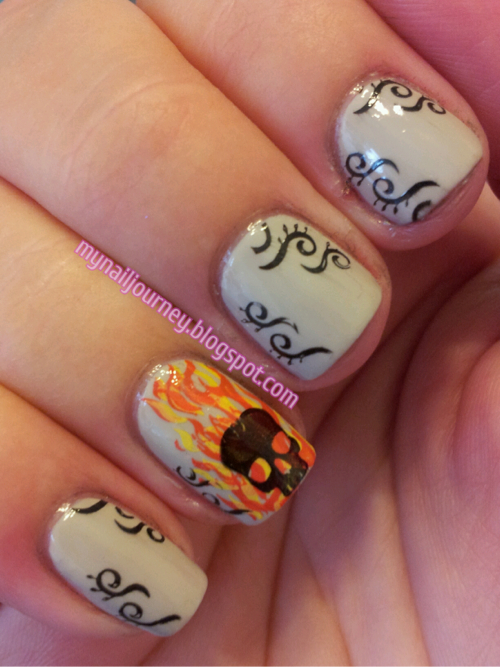
       It is Sunday and that means it is time for another stamping challenge in Adventures In Stamping, a group that I am in on Facebook.  Today's voted on theme was Halloween.  I am getting a little Halloween'd out with all of these other challenges I am involved with and wasn't going to participate until I remembered that I had a skull stamp in my collection that would never be used otherwise.  You see, I am not a skull person.  I don't understand why they are on everything right now, like the mustache.  But, to each their own.  I wasn't even sure how to use the skull in a mani when my husband grabbed the three plates I playing around with and told me what I should do.  The accent nail was his idea, except for the multiple stamping of the flames, and the little squirly q's were my idea.
     I just picked up Skull and Glossbones at T.J. Maxx for $3.99 yesterday and thought it would be perfect for a mani with a skull on it.  Upon further google searches, I am not even close to the only one who thought this was a good idea.  :-)  As described by Scrangie, Skull and Glossbones is a "ghostly light grey cream."  I thought this was going to be a three coater but after the second coat it has reached full opacity.  OPI is my favorite brand of polish and I really liked this more than I thought I would.  The half price price tag helped a lot, too.

Base coat: Sally Hansen Triple Strong Advanced Gel Nail Fortifier
Base coat: Skull and Glossbone from OPI - 2 coats
Top coat: Sally Hansen Insta-Dri Anti-Chip Top coat
Stamping plates: Mash 29 & 48
Stamping colors: Lightning and Heat Flash from Sally Hansen Insta-Dri and Stamp me! Black from Essence
Top coat: L.A. Colors Rapid Dry Top Coat

Taken inside without flash


This is how I came up with the little curls on the sides of each nail


I hope you guys enoy this!  Feel free to comment, I read each and every one of them.  They make me  happy!

Sunday, October 7, 2012

AIS: Metallic Madness - Silver Sweep from Sally Hansen With Mash Plate 46

     Happy Sunday all.  I hope that you are all having a very relaxing weekend.  I am not. :-) On top of my normal 60 hour work week I added on an extra ten hours working at the fall festival yesterday and today.  Oh well.  Other than my feet hurting, I can't complain.  Made enough money to cover a bill so that is all that matters, right?!
     Today's stamping challenge in the Facebook group, Adventures In Stamping, is Metallic Madness.  Now, I don't have that many metallics so I knew that I would be stamping with Silver Sweep from the Sally Hansen Insta Dri line.  For my accent nail I also used this color.

Base coat: Sally Hansen Diamond Strength Hardener
Base color: Ibiza from Zoya - 1 coat
Accent nail and stamping color: Silver Sweep from Sally Hansen Insta Dri - 1 coat
Stamping plate: Mash 46
Top coat: Sally Hansen Insta-Dri Anti-Chip Top Coat


Taken inside with flash


Taken inside without flash

All right, well I need to get caught up on my laundry for tomorrow since I wasn't able to get it done today.  I hope you guys enjoy this mani.


Wednesday, October 3, 2012

D is for... Daddy's Girl

     It's Wednesday again and that means it is time for another installment in the ABC's of Nails Challenge, hosted by Llama Nails on Facebook.  Today's letter is D.  I have been baffled all week as to what to do for this mani and then I remembered that I had this polish in my "untried" stash for a long time.  When I say untried, I mean that I haven't shown it on my blog.  I have worn it a few times and I love it!
     Other then the name, I love everything about this polish.  Daddy's Girl is a beautiful purple jelly with pink/purple micro glitters that turn this into a shimmery finish.  Thank God, because I am not a fan of jelly finishes.  Because of the jelly finish I needed to do three coats.  I decided that I couldn't just wear the polish alone so I added a simple shooting star stamp to each nail.

Base coat: Sally Hansen Diamond Strength Hardener
Base color: Daddy's Girl from Sinful Colors - 3 coats
Top coat: Sally Hansen Insta-Dri Anti-Chip Top Coat
Stamping color: Silver Sweep from Sally Hansen Insta-Dri Fast Dry Nail Color
Stamping plate: Mash 33


Here is the finished product.  Taken inside without the flash.


Taken inside without flash


Taken outside in indirect light.


Taken upclose.  So pretty.

Please check out the other "D" mani's with the links below.

Are you a fan of jelly polishes?


Sunday, September 30, 2012

AIS: Stamping With Mash Plate 29 Over The One That Got Away from O.P.I.

     Today's challenge in the Facebook group, Adventures In Stamping, was for us to use a french tip image.  I have a hard time using the french tip images because a, they are really hard to place straight, and b, my nails are so short that they take up half of my nail.  I decided to use the star image on the Mash 29 plate because I hadn't used it before and it was a smaller tip design in the fact that it wouldn't take up half of my nail.  I am pretty pleased with the turn out of this mani.  I only had to redo two of the images due to crooked placement.
     The base color for this mani is new to me.  I received it from one of my friends and fell in love with it a few days ago when I wore it by its self.  This color was released in the Katy Perry line from O.P.I. in January of 2011, before I became addicted to polish.  I am surprised to say though that I almost have this entire collection.  I just keep acquiring them through random journeys.  I do have to say that this is my favorite color from the line so far.  The One That Got Away is a BEAUTIFUL raspberry red with a glass fleck finish.  Due to this it can look different in different lights.  That is why I have so many pictures in this post today.  I really want you guys to see how wonderful this color is.

Base coat: Sally Hansen Diamond Strength Hardener
Base color: The One That Got Away from O.P.I. - 2 coats
Stamping plate: Mash 29
Stamping color: Silver Sweep from Sally Hansen Insta-Dri
Top coat:  Sally Hansen Insta-Dri Anti-Chip Top coat


This was taken inside under fluorescent lighting without the flash


Taken inside without flash


Taken inside without flash


Taken outside in indirect light


Taken outside in indirect light


Do you guys have problems when it comes to stamping on a tip image?  How have you overcome this battle?


Sunday, September 9, 2012

Adventures In Stamping: Stamping With Mash Plate 38

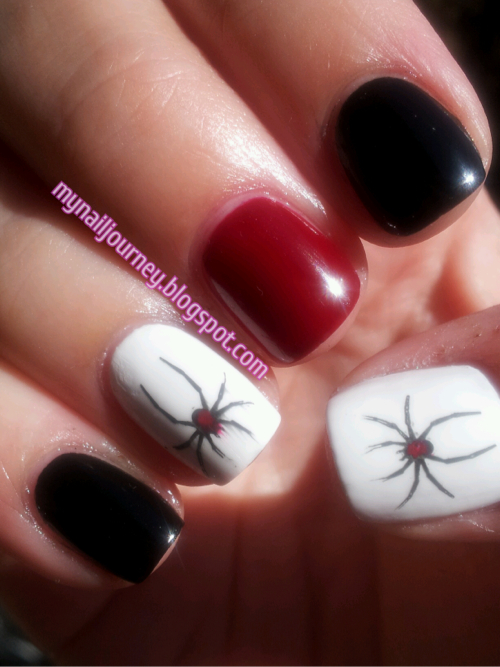
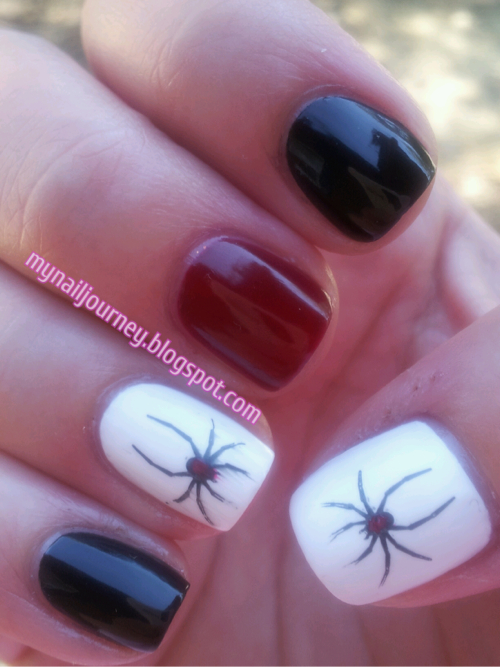
     Our Sunday stamping challenge for the Facebook group, Adventures In Stamping, was to stamp with the theme of something toxic or poisonous.  I was at a standstill with what to do.  I googled poisonous plants and learned that parts of cherries are poisonous.  So I thought that that would at least be a cute mani.  While I was digging through my plates searching for the plate with the cherries on it, I found a plate with a spider on it.  That brought back vivid memories of the four black widows we have killed in the last few years, and what I beleive to be a hobo spider that was on our porch just a few days ago.  My poor husband.  I just stood there freaking out.  I never had a fear of spiders up until we started killing those black widows.  So I figured today would be the best day to use this stamp because I will probablly never use it again.

Base coat:  Sally Hansen Diamond Strength Hardener
Base colors: Pinky and pointer finger - Black Cream from Wet N' Wild - 1 coat
                     Ring finger and thumb - French White Tip from N.Y.C. - 3 coats
                     Middle finger - Sealed With A Kris from Nicole by OPI - 3 coats
Stamping color: Black Cream from Wet N' Wild
Stamping plate: Mash 38
Red on back of spider: Red Red from Wet N' Wild
Top coat: Sally Hansen Insta - Dri Anti - Chip Top Coat


Taken outside in direct light


Taken inside without flash


Taken outside in indirect light


I know these pictures aren't the greatest but I couldn't handle looking at the spiders up close anymore.  Sorry.


Friday, August 31, 2012

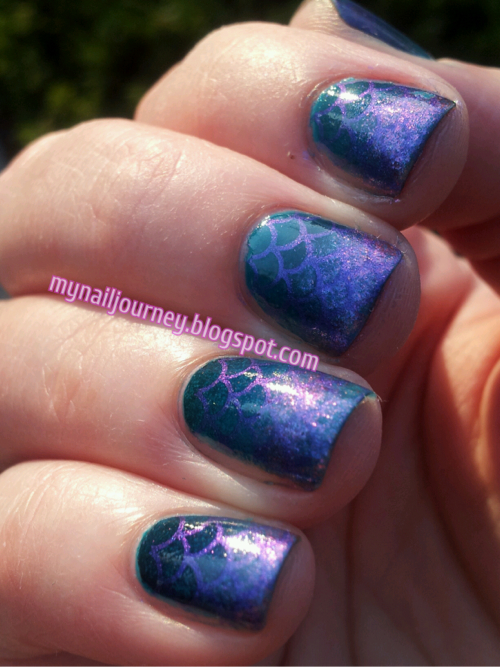
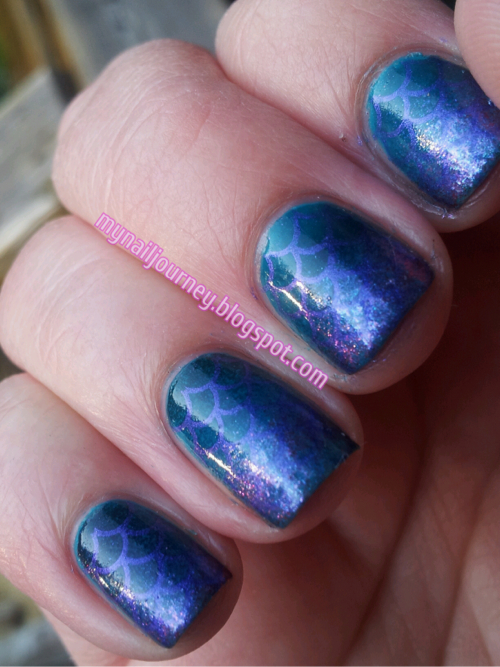
Mermaid Nails: Gradient Plus Stamping With Mash Plate 39

     In the Facebook group, Crumpet's Nail Tarts, our Summer Challenge for today was to do a mermaid mani.  I wasn't quite sure what I was going to do since there was no way in hell I would be able to draw an actual mermaid on my nails.  I googled mermaid nails and quickly figured out that I needed to do a gradient with a scale like stamp to mimic a mermaid's tail.  I am so pleased with how this came out.  I wish I could have captured all of it's beauty in the photos, but there was not very good sunlight out.  :-(  It turned out exactly how I wanted it.  Beautiful, sparkly, and just a hint of  scales.

Base coat: Sally Hansen Diamond Strength Hardener
Base color: Fly from OPI - 2 coats
Gradient colors: Fly-closest to my cuticle
                           Khloe Had A Little Lam-Lam from Nicole by OPI - in the center
                           Grape...Set...Match from OPI- at the tip of the nail
Stamping color: Let's Talk from Sinful Colors
Stamping plate: Mash 39
Top coat: Sally Hansen Insta-Dri Anti-Chip Top Coat


I hope that you like these as much as I do!


Tuesday, August 28, 2012

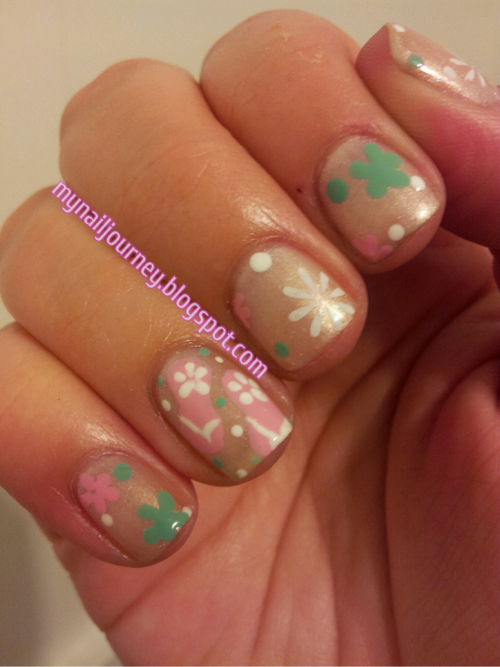
Flip Flop Mani

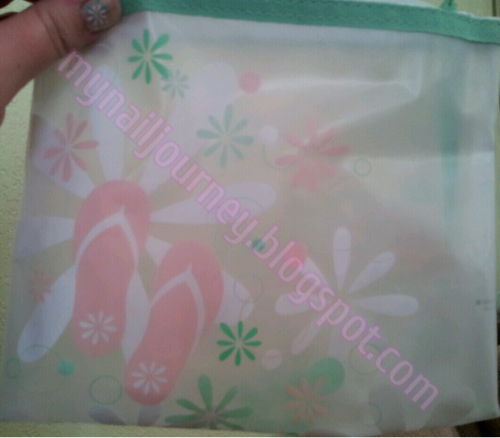
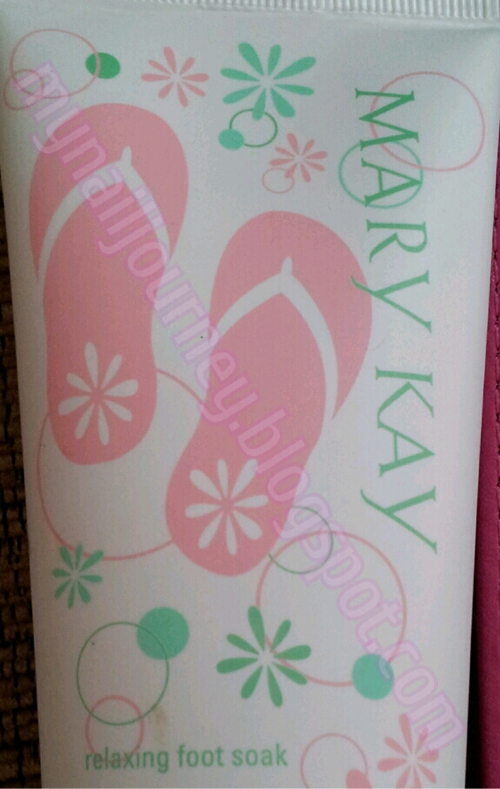
     Today's challenge mani topic was flip flops.  I was a little sad when I read this because I don't have the cute stamp that everyone has with the flip flops on it and I wasn't very inspired because I only have flip flops with a straight color, not a cute design on them.  I was just going to do a skittle mani with all of the colors of flip flops I own, but then I remembered how I wanted to paint the designs from my pedi bag onto my nails.  It was the perfect idea!

See, flip flops!  The bag is very sheer so here is a picture of one of the bottles of products that comes in this uber cute bag.


Base coat: Sally Hansen Diamond Strength Hardener
Base color: Glazed Pearl from SXY by Unforgettable Moments - 2 coats
Pink: Pink Friday from OPI
Green: I Need a Refresh-Mint from Wet N' Wild
White:
     Straps on flip flops: White from Kiss Brush On Nail Art Paint
     Flowers on flip flops and dots: French White Tip from NYC
     Stamped flowers: Stamp Me! White from Essence
Stamping plate: Mash plate 35

As I am sure you will be able to tell, the green and pink flowers were done by hand.  I used a dotting tool to do these and the random dots that are all over.  The white flower on my middle finger was the only one that was stamped on to my nail.

Taken inside without flash


So, what do you think of my recreation?


Sunday, August 26, 2012

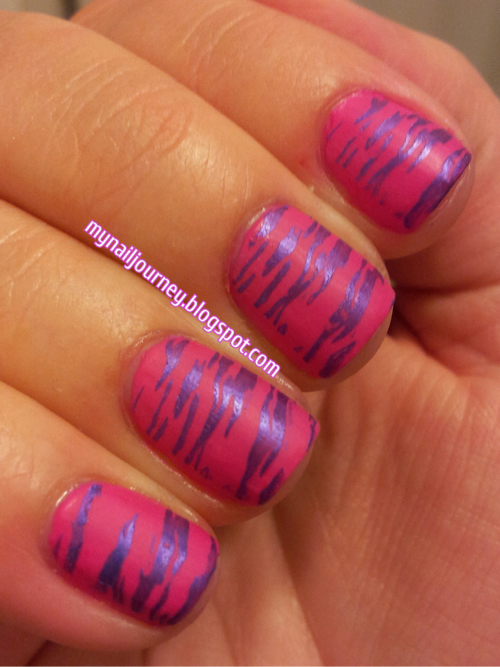
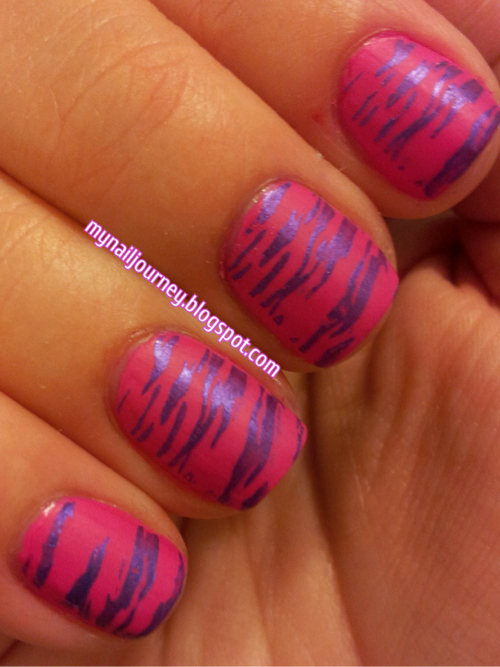
Zoya Lolly and Stamping With Sinful Colors Let's Talk and Mash Plate 38

     Today's challenge in the Facebook group Adventures In Stamping was pulsating pink and purple.  I figured it would be a really good time to try out my camo stamp that i have been dying to try since I got it.  I love camo.  My sister makes fun of me and tells me she doesn't understand who snuck in to my bedroom in the middle of the night and raised me because I love everything country/western, penguins, and nails.  Odd mix of things lol.
     I was irritated how this ended up looking more like zebra print though.  I think next time I will try mixing the stamping with white and purple so that it creates more of a girly camo look.
     I decided to us Zoya Lolly for the base color, a bright pink with a matte finish.  The formula on this was funky!  I ended up doing three coats to even it out.  I then applied my Essence Nail Art Special Effect! Topper, waited for it to dry and then did the stamping.

Base coat: Sally Hansen Diamond Strength Hardener
Base color: Lolly from Zoya - 3 coats
Top coat: Essence Nail Art Special Effect! Topper
Stamping color: Let's Talk from Sinful Colors
Stamping plate: Mash 38


All these pictures were taken inside without the flash


Monday, August 13, 2012

OPI Grape...Set...Match Swatches and Stamping With Mash Plate 46

     I picked up OPI's Grape...Set...Match for free!  I am sure that you are asking yourself how by now.  Well, let me tell you.  Because I am such a nail freak enthusiast I follow many other nail enthusiast on Facebook.  When something cool pops up in the polish world every single one of them like to talk about it.  Turns out the website copius.com is kinda like an E-Bay thing.  People are allowed to list, sell, and buy stuff on there and when a new person signs up from someone else's link they get a $10 credit to use.  I actually paid $.59 for this polish because the asking price was $9.99 and of course they threw som $.60 fee in there.  But whatever, $.59 for a new OPI, great, SOLD.  I don't have a link for you guys to follow but if you follow a lot of nail bloggers on Facebook, trust me, you will see tons of opportunities to snag the $10.00 Copius sign up credit from them.
     Grape...Set...Match was released in 2011 as part of the Glam Slam! Collection.  It is a purple metallic duochrome that shifts from purple to blue.  It isn't a very big color shift, in my opinion it is more of a purple metallic with a blue shimmer to it.  Maybe the duochrome effect would be more noticed with three coats instead of two.
     Of course I had to add some stamping to my swatch because plain swatches bore me to death, lol, unless they are the perfect ones that come from Scrangie's blog, of course. 

Base coat: Sally Hansen Hard As Nails Hardener
Base color: Grape...Set...Match by OPI - 2 coats
Stamping color: Stamp Me! White by Essence
Stamping plate: Mash 46
Top coat: Sally Hansen Insta-Dri Anti-Chip Top Coat


Finished product


Taken outside in direct sunlight


Taken outside in indirect light.  The duochrome is most noticible here


Taken inside with out flash


What do you think of Grape...Set...Match?  Do you have it in your collection or did you pass on it last year?


Sunday, August 5, 2012

Sally Hansen Celeb City Swatches and Stamping With Mash 41

     Hello everyone!  Did you miss me?  I just worked an 80 hour week so I was unable to post to my blog, let alone paint my nails.  I did end up being able to try the Sally Hansen Nail Wraps though.  There will be a post on those later this week.
I have never been more excited to paint my nails!  My addiction has become clearer to me...
     Todays challenge in the Facebook group Adventures In Stamping was to stamp involving silver, gold, and bronze.  Celeb City has been in my stash since before my addiction began.  Meaning, it is a few years old, and it still applies like a dream!  I have always loved this color.  I think I bought it because I saw a soap operah star wearing a silver color and loved it.

Base coat: Sally Hansen Hard As Nails Hardener
Base color: Celeb City By Sally Hansen Hansen Hard As Nails Xtreme Wear
Top coat: Sally Hansen Insta-Dri Anti-Chip Top Coat
Stamping color: Let's Talk by Sinful Colors
Stamping plate: Mash 41


Taken in direct sunlight


Taken in indirect sunlight


Inside without flash