Showing posts with label Milani. Show all posts

Thursday, December 27, 2012

N is for ... Navy, Russian Navy

       Why hello there fellow nail art enthusiasts.  I have been MIA for a few weeks, but have no fear, I am here!  I didn't stop doing my nails, I just needed some time away from the blog-o-sphere.  I'm not going to lie, I was a little disappointed with the amount of feedback I received on my last blog post.  I worked so hard on that Minnie, and it didn't seem to spark much interest!  After sulking for a while, I decided it was time to jump back in to what I love to do and not care about the comments and such.  Of course that means that my "N" challenge for the Facebook group, Llama Nails is a little late, but what's that saying ... better late than never?!
     I have worn this color so many times and never been able to capture its beauty until today.  I was so excited when the sun was shining after work today that I ran into the house and started to do this mani, again, so that I could show you the beauty that is Russian Navy.  This was on my wish list for so long, and it does not disappoint, well, unless there is no sun! :-)

Base coat: Pro-Fx Fiberized Ridge Filler
Base color: Russian Navy from OPI - 2 coats
Accent nail: White on the Spot from Milani -2 coats
Top coat: Seche Vite
Stamping color: Sapphire from Kleancolor
Stamping image: Unmarked plate from Essence

All pictures were taken in direct sunlight


I wish it wasn't so hard to show the beauty of Russian Navy, but oh well, it's worh it.  How was your Christmas?  Did anyone get any polish in their stockings?


Monday, December 10, 2012

Llama Nails: M is for... Minnie Mouse

       Happy Monday!  Today I have for you my weekly installment for the ABCs of nail art challenge in the Facebook group, Llama Nails.  Each week we have to do nail art related to a specific letter and this week's letter is M.  I decided to do Minnie Mouse.  I couldn't be happier with the way this turned out.  I tried a new base coat with this mani and it lasted two days!  My manicures never last this long.  I picked up the Fiberized Ridge Filler from the Pro FX line.  I got it at WalMart and a 2.5 fluid oz. bottle cost me right around five dollars.  I am so glad that I picked this up because I used it on this mani and the one I did yesterday, and my mani's have never stayed on my nails better!

Base coat: Fiberized Ridge Filler from Pro FX
Base color: Red Red from Wet N Wild - 1 coat.  UMM CAN YOU BELIEVE ONE COAT?!?!  YEAH, ME NEITHER.  OK, done freaking out about that.
White on the Spot from Milani -2 coats
White dots: Superstar from Pure Ice
Minnie Mouse: All acrylic paint is from Artist's Loft that I bought at Michaels
Black-Lamp Black
Face-Titanium White, Burnt Sienna, and Yellow Ochre
Bow-Crimson Red and Titanium White for the dots
Tongue-Crimson Red mixed with Titanium White
Top coat: Seche Vite

I used a dotting tool to apply all the polka dots that are not on my accent nail.  I used my smallest brush for all of Minnie except for the eyelashes; I used my striping brush for that.


You can check out these other "M" challenge's using the codes below.  I hope you enjoyed my Minnie Mouse mani.


Sunday, November 25, 2012

Stamping With Mash 42 Over Sinful Colors Gradient

       Happy Sunday everyone!  I am typing this with one hand because I have a baby on my lap!  But it is OK, because he is the cutest baby on the face of the earth, and my best friends baby.  Although, I'm sure mine will be cuter. ;-)  Today's post is for the Facebook group, Adventures In Stamping.  Each week we vote on a challenge, and this week the challenge is for us to stamp over a blue base.  I decided I wanted to do a blue gradient and it turned out beautifully.
     I also thought today would be a great way to use some of my whites that I haven't tried stamping with, to see how they worked.  We get a lot of questions referring to cheaper polishes to stamp within the group, and I figured my left hand would be a great way to kill two birds with one stone.  As you will see, my cleanup is terrible with my non dominant hand, and I'm also hiding a brutal hangnail.  It is so brutal, I couldn't even apply acetone to it to clean it up.  :-(  Winter is so harsh on my hands!

Base coat: Sally Hansen Triple Strong Advanced Gel Nail Fortifier
Base color: Cinderella from Sinful Colors - 2 coats
Gradient colors: Cinderella, Why Not, and Hot Spot from Sinful Colors
Topcoats: Sally Hansen Insta-Dri Anti-Chip Top Coat and Essence Gel Like Top Coat
Stamping colors: Stamp Me! White from Essence, White On The Spot from Milani, and Superstar! from Pure Ice
Stamping image: Mash 42

This picture was taken outside.  All stamping is done with Stamp Me! White from Essence


This picture was taken inside without flash.  All stamping was done with Stamp Me! White from Essence.


This picture was taken inside without flash.  Stamping was done with White On The Spot from Milani on the pointer and ring finger, and Superstar! from Pure Ice on the middle and pinky finger.


This picture was taken outside and stamping is done as described above the previous picture.


As you can see, the difference is pretty dramatic between the three whites I stamped with.  I will keep using the stamping polish from Essence, unless I can find something better.  I know the last two pictures look fuzzy, but it is actually the stamping that is making them look fuzzy. :-(  Crazy, huh.


Monday, October 15, 2012

SassyNail Nail-Aween Nail Art Challenge: Day 4 Mummy Nails FAIL!!!

     I decided to skip MSMD (Monkey See, Monkey Do) Monday's again this week so that I could get past my mummy nail challenge hurdle.  I have been putting this off for far to long and I knew that since the month was half way over today I just needed to buck up and do this.  See, my problem is that I don't like to do the same type of thing as everyone else.  I like to be a little different.  (Funny because I spent my entire childhood trying to be like everyone else, but that is an entirely different issue :-))  Everyone in the challenge came up with awesome mummy mani's and I thought mine would be just as creative, but alas, it is not.  My husband thought it was a gingerbread man!!!  See, fail!  Lol.  I don't even want to show you guys this but I promised myself when I started my blog that I would post the good, the bad, and the ugly.  I don't think I knew what I was getting myself into.
     There is a silver lining to this mani though, well actually, two.  I did NO cleanup and I got to use my first ever China Glaze polish!!!  I just bought it the other day when I was shopping for my nail polish buddy and got uber jealous of the beauties I was purchasing for her!  I'm Not Lion was just released as part of China Glaze's On Safari collection.  I only wanted two of the polishes from the collection, and this was one of them!

Base coat: Sally Hansen Diamond Strength Hardener
Base color: I'm Not Lion from China Glaze - 3 coats
White base color: White On The Spot from Milani - 1 thick coat
Mummy/gingerbread man ;-): Black acrylic paint from Artist's Loft
Top coat: Sally Hansen Insta-Dri Anti-Chip Top Coat

Taken inside my truck with the flash because I don't care how the picture turned out!


You can check out the original image here.  Trust me, it's much better looking than mine.  

This challenge is being put on by SassyNails over on Facebook.  If you're not a Facebook person you can check out her blog here.

If you want to see some much better mummy manicure's please check out these other lovely ladies blogs!


Saturday, October 13, 2012

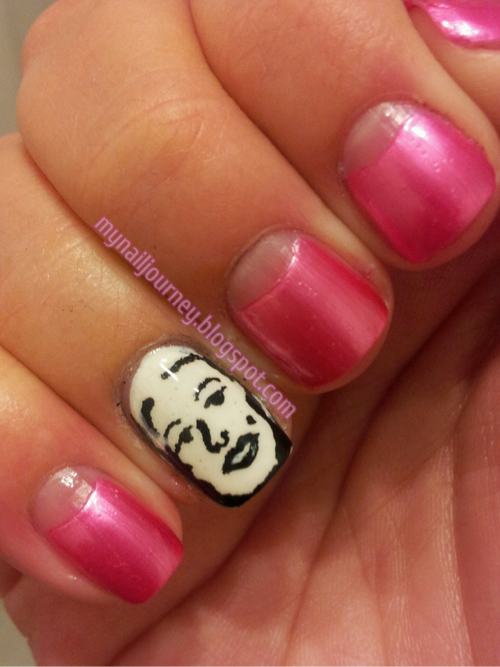
CNT Sat-ART-Day: The 50's

     Ok, so for most of you it is Sunday, but the great advantage of living on the West Coast of the United States is that we are way behind everyone else!  I still have four hours left to post this.  :-)  I am not going to lie, I am very pleased with how this turned out.  Are you getting curious?  Good!
     Today's mani comes from two things.  I brain stormed this mani this morning with the assistance of Google.  I did a search for 50's fashion and stumble upon Marilyn Monroe.  I'm sure most of you know she is from the 50's and I hate to admit that I had no idea.  I didn't even know she was an actress until I saw a video at my girlfriends house the other day, (that of course I can not find on YouTube for the life of me right now! (I had a very sheltered childhood. ))  In 1953 Marilyn played in Gentleman Prefer Blonds.  In this movie she preforms the song, "Diamonds Are A Girls Best Friend" in a beautiful yet shocking (for the times) pink dress.  This is where the inspiration for the pink half moons came.
     I then remembered the first Robin Moses video I saw.  In this video Robin shows us how to do a beautiful Marilyn manicure.  When I saw this for the first time I thought there would never be a day that I would be able to do something like this.  Well, Robin's advice of practice, practice, practice paid off.  
     I am a little dissapointed with the bubbling that occured.  My top coat is basically gone and I tried to be a cheapskate and get the last little bit out.  I wish I would have just opened my new bottle.  Does anyone know why polish companies don't let the brushed extend further into the bottle?  I feel like it is such a waste of polish once you get half way through the bottle.

Base coat: Sally Hansen Diamond Strength Hardener
Pink: Lavendar Pearlescent from Wet N' Wild Wild Shine - 3 coats
White: White on the Spot from Milani - 1 coat
Marilyn: Black acrylic paint
Top coat: Sally Hansen Insta-Dri Anti-Chip Top Coat


Well, what do you think?

If you want to check out some more 50's inspired manicures, check out these other blogs!


Friday, October 12, 2012

E is for... Eeyore

     Hey everyone.  Today am I posting my mani that was supposed to posted on Wednesday but I decided to nap instead.  Luckily we have from Wednesday to Tuesday to post our mani for the week.  I mixed most of the colors for Eeyore myself and I think that they came pretty close to the original color.  For Eeyore's face and ears and I mixed Crimson Red, Platinum White, and Ultramarine Blue in Artist's Loft acrylic paint.  For his nose I mixed Burnt Sienna and Platinum White and for his ears and bow I mixed Crimson Red with Platinum White. I should have gone a little darker on the ears, but I didn't realize that they were a little to sheer until after I was finished.  I hope that you like this.

Base coat: Sally Hansen Diamond Strength Hardener
Base color: Smooth Sailing from Essie - 2 coats
                   White On The Spot from Milani - 1 thick coat
Top coat: Sally Hansen Insta-Dri Anti-Chip Top Coat