Wednesday, September 12, 2012

ABC Nail Challenge: Anchor Stamping

     Today marks the start of a new challenge.  Our summer challenge has come to an end, (all though I was a TERRIBLE participant) and a new one is beggining.  It is called the ABC's Challenge.  I am excited to do this!  Each Wednesday we will be working on one letter of the alphabet and doing a mani that starts with that letter.  Example: A is for Avon, and using an Avon polish, or B is for Bee and stamping with a Bee, etc, etc.  Hopefully you get the picture because I am terrible at explaining stuff like this.
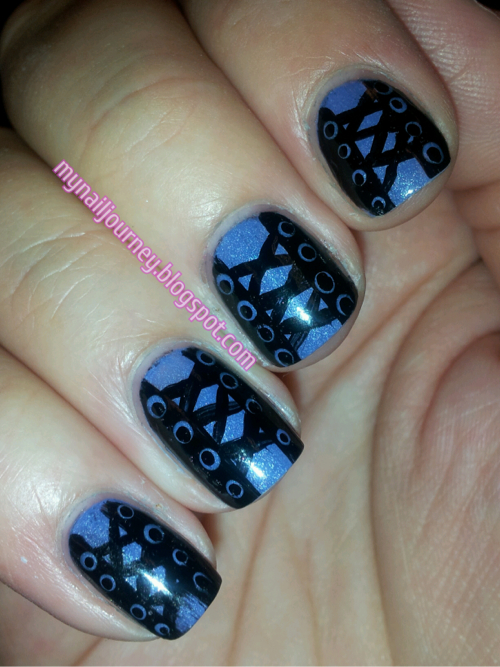
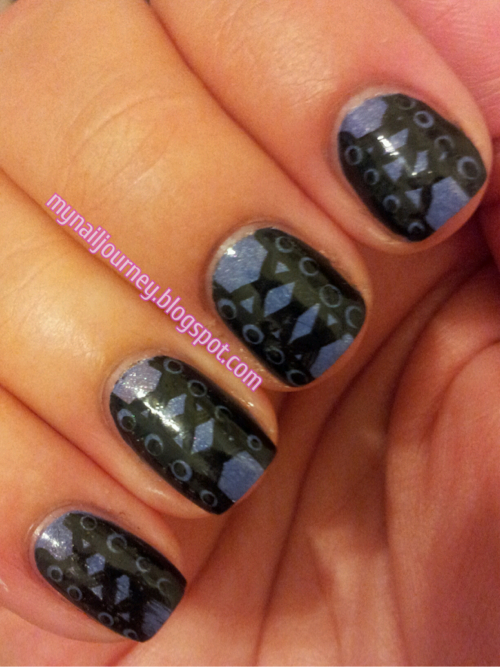
     I had my whole A mani planned out, even consulted with the hubs about it, and as I was searcing through my plates I found one from Essence with an anchor on it.  The light bulb went off.  A is for anchor!!  So off I went to do an anchor mani.  I REALLY need to work on my patience when it comes to stamping.  I also need to remember that my Sally Hansen top coat is not Seche Vite, and if it is applied in the same manner it WILL bubble!  Ugh.  Oh well.  As much as I want to be perfect, no one is.  Except Chalkboard Nails...


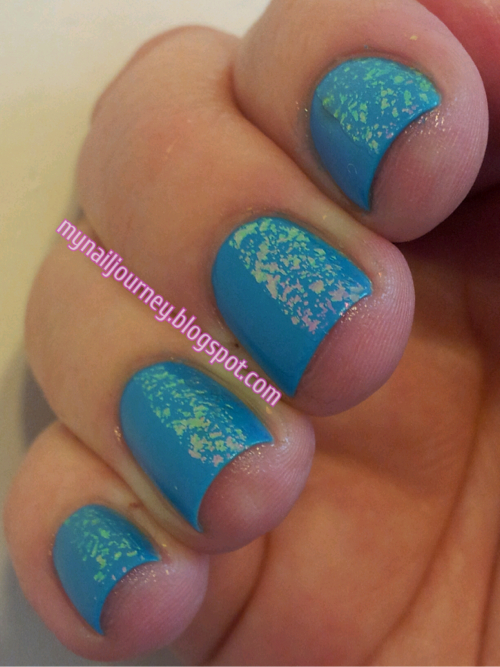
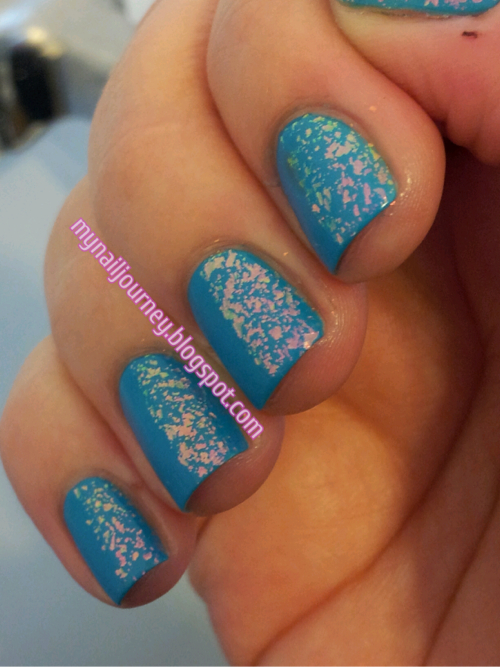
Base coat:Sally Hansen Diamond Strength Nail Hardener

Base colors: White - French White Tip from N.Y.C. - 3 coats

                     Blue - Smooth Sailing from Essie - 2 coats

                     Red - Ruby Slipper from Avon (also used for the half moons)

Stamping colors: Stamp Me! White from Essence

                            Blue - Why Not from Sinful Colors

Stamping plate: not numbered from Essence

Top coat:  Sally Hansen Insta-Dri Anti-Chip Top Coat


Taken inside without the flash


Well, what do you think?  If you have some time you should check out these other A mani's...


(Submissions close in 175d 7h 45m)
Link tool by inlinkz.com

Monday, September 10, 2012

MSMD: Shoelace Manicure

     Today's Monkey see, Monkey do (MSMD) manicure is brought to you via Michelle from Mimi's Manicure's.  She posted this manicure in Polish-o-rama, one of the Facebook groups that I am in, and I immediatly fell in love.  She quickly came out with a tutorial and I followed it to the tea.  I love the way that this turned out.  I should have waited a little longer to apply my top coat, as you can see it smeared on my pinky, but what's a manicure without a little smear?!  I also think that this looks more like the back of a  corset then shoes, which makes them even more sexy.  I really encourage you to check out the mani that Michelle did because her nails are sexy long and look way better than mine.


Base coat: Sally Hansen Diamond Strenght Hardener

Base color: Smooth Sailing from Essie - 2 coats

Black: Black cream from Wet N' Wild - applied with a striping brush

Top coat:  Sally Hansen Insta-Dri Anti-Chip top coat


Taken inside with flash


Taken inside without the flash


Do you think shoes or corset when you see these?  I hope to hear from you all, have a great Monday!  Oh, and don't forget to check out these other lovely ladies who have participated in the MSMD challenge today! :-)


Sunday, September 9, 2012

Adventures In Stamping: Stamping With Mash Plate 38

     Our Sunday stamping challenge for the Facebook group, Adventures In Stamping, was to stamp with the theme of something toxic or poisonous.  I was at a standstill with what to do.  I googled poisonous plants and learned that parts of cherries are poisonous.  So I thought that that would at least be a cute mani.  While I was digging through my plates searching for the plate with the cherries on it, I found a plate with a spider on it.  That brought back vivid memories of the four black widows we have killed in the last few years, and what I beleive to be a hobo spider that was on our porch just a few days ago.  My poor husband.  I just stood there freaking out.  I never had a fear of spiders up until we started killing those black widows.  So I figured today would be the best day to use this stamp because I will probablly never use it again.

Base coat:  Sally Hansen Diamond Strength Hardener
Base colors: Pinky and pointer finger - Black Cream from Wet N' Wild - 1 coat
                     Ring finger and thumb - French White Tip from N.Y.C. - 3 coats
                     Middle finger - Sealed With A Kris from Nicole by OPI - 3 coats
Stamping color: Black Cream from Wet N' Wild
Stamping plate: Mash 38
Red on back of spider: Red Red from Wet N' Wild
Top coat: Sally Hansen Insta - Dri Anti - Chip Top Coat


Taken outside in direct light


Taken inside without flash


Taken outside in indirect light


I know these pictures aren't the greatest but I couldn't handle looking at the spiders up close anymore.  Sorry.


Friday, September 7, 2012

Glue Base Coats for Glitter Manicures: How Effective Is It?

     Today's post is my attempt at using Elmer's School Glue as a base for glitter polishes.  If you are thinking, what the hell is this lady talking about, I really think you HAVE to read LabMuffin's blog post.  Did you read it?  Don't lie.  Just do it.  It is fast and easy and you will thank me.
     Ok, now that you have read Lab Muffin's blog post, I feel it is of dire importance that you also check out this blog post from Pretty Purple Polish, where she showed me that I really needed to try this.  She did a 5 day wear test of not only the glue as a peel of base, but also included different base coats and orders of application to show which way worked the best for her.  Now, you may be wondering why, with this wealth of knowledge, I feel the need to share my experience with you.  Let me tell you my story.
     I wash my hands a lot.  And when I say a lot, I mean probablly somewhere close to 100 times a day.  No, I am not a germaphobe, but I work in food service.  My hands are constantly in and out, in and out, in and out of water.  My hands crack, bleed, chap, and hurt.  But at least you know I won't make you sick!  (It takes a lot for me to have my hands picture ready for you guys).  I knew that I would be a perfect test subject for this new phenomenon.  I honestly didn't think that it would work.  I wish that I could tell you guys that it was great and that I will be doing this all the time, but I can not say that.  :-(  With in four hours my polish was gone from three fingers.  Before my shift was over, it was completely gone.  I am so sad that I can't use this method because it really does just peel right off.  I was uber, uber careful like Lab Muffin said to be.  I made sure there was no glue what so ever touching my skin, but it still didn't help.
     I will however say that I may have gotten a little carried away with the amount of glitter and top coats that I used, which could of had a harsher effect on the outcome of my testing.  I may have to try this again with only one or two layers of glitter and a top coat.  I do, however, plan on using this method when I do swatches.  It will be fantastic to remove the polish within a minute rather than 15.

Base coat: Elmer's School Glue
Base color: Black Cream from Wet N Wild - 1 coat
Glitter- in order of application: Green Ocean from Sinful Colors - 1 coat
Shine of the Times from Essie - 1 coat
Party of Five Glitters from Wet N' Wild - 1 coat 
Top coat: Essence Nail Art Special Effect! Topper - 2 coats

As you can read, a lot of layers.

At least I got a beautiful mani out of this experiment.


All of these were taken inside with out the flash.


And here is my nails on my lunch break. :-(  I didn't want to show my thumb but whated you guys to see how it peeled off.  Side note, my cuticles used to all look like my thumb!  I can't believe how much blogging has made me change my terrible cuticle habbits!


So, have you tried using a glue as your base coat?  What about the glittler removal method?  Do you scrub, scrub, scrub it off, or have you just sworn off glitter all together?  I hope you like this post and feel free to comment, comment, comment.  :-)


Monday, September 3, 2012

Blue Me Away! by Sally Hansen and Shine of the TImes Tape Mani

     It is time for another installment of Monkey See, Monkey Do.  If your new to my blog and have never heard of this, it is where a group of us, Crumpet's Nail Tarts, recreate mani's we see around the web, (usually from Pinterest or Facebook,) and post them on to our blogs.  I found the inspiration for today's mani on Victoria's Nails Blog.
     I kinda did something stupid and used Blue Me  Away! from Sally Hansen, which has a glossy finish, instead of just opting to use Phoebe from Zoya, which is already a matte polish!  Ugh.  I didn't think about this until I had to redo my pointer finger for the THIRD time due to being impatient!  Oh well.  Live and learn, right.  When I applied Shine Of The Times, I used to tape to make sure I got straight lines. :-)  I love me some straight lines.


Base coat: Sally Hansen Diamond Strength Hardener

Base color: Blue Me Away! from Sally Hansen - 2 coats

Flakie: Shine Of The Times from Essie

Top coat: Nail Art Special Effect! Topper from Essence - I did not apply this over Shine Of The Times


All pictures were taken inside with out the flash


Can you tell that I didn't use tape on my pointer finger?  I pretty much gave up.  :-(  What do you guys think of this?  If you want to see some more Monkey See, Monkey Do mani's, check out these other blogs.


(Submissions close in 6d 7h 19m)
Link tool by inlinkz.com