Saturday, October 13, 2012

CNT Sat-ART-Day: The 50's

     Ok, so for most of you it is Sunday, but the great advantage of living on the West Coast of the United States is that we are way behind everyone else!  I still have four hours left to post this.  :-)  I am not going to lie, I am very pleased with how this turned out.  Are you getting curious?  Good!
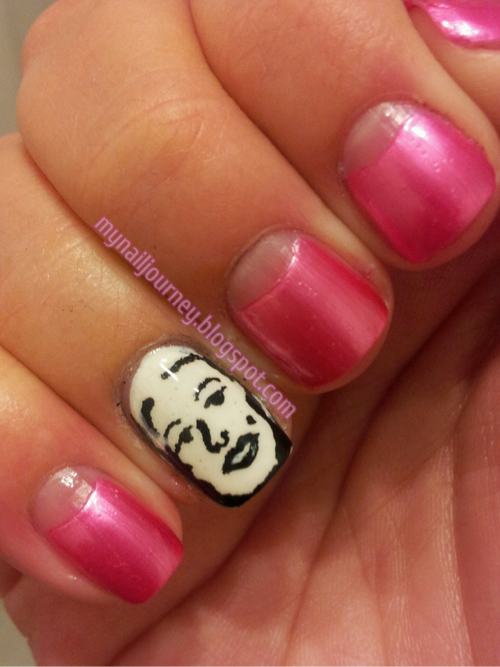
     Today's mani comes from two things.  I brain stormed this mani this morning with the assistance of Google.  I did a search for 50's fashion and stumble upon Marilyn Monroe.  I'm sure most of you know she is from the 50's and I hate to admit that I had no idea.  I didn't even know she was an actress until I saw a video at my girlfriends house the other day, (that of course I can not find on YouTube for the life of me right now! (I had a very sheltered childhood. ))  In 1953 Marilyn played in Gentleman Prefer Blonds.  In this movie she preforms the song, "Diamonds Are A Girls Best Friend" in a beautiful yet shocking (for the times) pink dress.  This is where the inspiration for the pink half moons came.
     I then remembered the first Robin Moses video I saw.  In this video Robin shows us how to do a beautiful Marilyn manicure.  When I saw this for the first time I thought there would never be a day that I would be able to do something like this.  Well, Robin's advice of practice, practice, practice paid off.  
     I am a little dissapointed with the bubbling that occured.  My top coat is basically gone and I tried to be a cheapskate and get the last little bit out.  I wish I would have just opened my new bottle.  Does anyone know why polish companies don't let the brushed extend further into the bottle?  I feel like it is such a waste of polish once you get half way through the bottle.

Base coat: Sally Hansen Diamond Strength Hardener
Pink: Lavendar Pearlescent from Wet N' Wild Wild Shine - 3 coats
White: White on the Spot from Milani - 1 coat
Marilyn: Black acrylic paint
Top coat: Sally Hansen Insta-Dri Anti-Chip Top Coat


Well, what do you think?

If you want to check out some more 50's inspired manicures, check out these other blogs!


Friday, October 12, 2012

E is for... Eeyore

     Hey everyone.  Today am I posting my mani that was supposed to posted on Wednesday but I decided to nap instead.  Luckily we have from Wednesday to Tuesday to post our mani for the week.  I mixed most of the colors for Eeyore myself and I think that they came pretty close to the original color.  For Eeyore's face and ears and I mixed Crimson Red, Platinum White, and Ultramarine Blue in Artist's Loft acrylic paint.  For his nose I mixed Burnt Sienna and Platinum White and for his ears and bow I mixed Crimson Red with Platinum White. I should have gone a little darker on the ears, but I didn't realize that they were a little to sheer until after I was finished.  I hope that you like this.

Base coat: Sally Hansen Diamond Strength Hardener
Base color: Smooth Sailing from Essie - 2 coats
                   White On The Spot from Milani - 1 thick coat
Top coat: Sally Hansen Insta-Dri Anti-Chip Top Coat


Thursday, October 11, 2012

CNT Halloween Nail Challenge: Witches

     Today in the Facebook group, Crumpet's Nail Tarts, our challenge is witches.  As with all these challenge post's I never have any idea what the heck I am going to do.  All I knew is that I wanted to use Scandalous from Revlon as the base.  Scandalous is a black base with purple hex and micro glitter.  This formula dried very fast on me and is opaque in two coats.  I am a sucker for a dark color and this seemed perfect for a Halloween mani.  I was going to use a dark purple creme for my accent nail but then figured my witch design wouldn't show well against a dark base.  Then I saw Essie's Pretty Edgy and knew that this was the perfect accent color.  A beautiful green that would be perfect for a witches face.  And the rest is history from there!

Base coat: Sally Hansen Diamond Strength Hardener
Base color: Scandalous from Revlon -2 coats
Accent color: Pretty Edgy from Essie - 2 coats
Witch colors: Lamp Black and Lemon Yellow from Artist's Loft acrylic paint
Top coat: Sally Hansen Insta-Dri Anti-Chip Top Coat


I hope you enjoy my witch!  If you want to check out some crazy, awesome witch manis check out these ladies blogs who are also doing this challenge.


Tuesday, October 9, 2012

CNT Halloween Challenge Day 3: Zombies

     Today in Crumpet's Nail Tarts Halloween Challenge we are supposed to do Zombies.  Now, let me start off by saying, I am not a fan of zombies.  Don't like them, don't watch them, don't know what they look like, don't want anything to do with them.  Off to Google I went... (Does this sound familiar?  I love Google).  I searched "cute zombies" and found this image.  It was the cutest one I could find and I figured that I could re-create it.  I think I did a pretty good job.  
     After I painted Ibiza on my ring finger I painted the entire zombie in white acrylic paint so that when I added the color it would pop.  

Base coat: Sally Hansen Diamond Strength Hardener
Base color:
  accent nail: Ibiza from Zoya - 1 coat
  other nails: Night Prowl from Wet N' Wild - 2 coats - How ironic, right!  Perfect name.
Zombie attire:
  face and hand: San Tan-Tonio from O.P.I.
  brain: The One That Got Away from O.P.I. mixed with white acrylic paint
  shirt: I Need A Refresh-Mint from Wet N' Wild
  pants: Why Not from Sinful Colors
  heart: The One That Got Away from O.P.I.
  outline: Lamp Black from Artist's Loft acrylic paint
Top coat: Sally Hansen Insta-Dri Anti-Chip Top Coat      


AND a close up of my cute little zombie...

I hope you guys like my take on the zombie mani.  If you are interested in more gorey zombies, check out the other manis from this challenge.


Monday, October 8, 2012

SassyNails NailAween Nail Art Challenge: Day 3 - Bloody Nails

     Hey everyone!  Today I am skipping MSMD Monday to get along with one of my nail art challenges.  This one is hosted by SassyNails on Facebook.  I am on day three and today's challenge was bloody nails.  Now, I'm sure you all have seen  bloody nails around, especially around this time of year, and they all seem to be the same to me.  Now this is ok but I really wanted to do something different, so I came up with this idea.
     After I painted a white base on my nails and it dried, I painted on some red acrylic paint, waited about 30 seconds for it to dry a little and then rolled my finger through it to create a bloody finger print effect.  I think that this turned out pretty cool.  I went to clean up the mani but decided it looked much bloodier if I didn't.  What do you guys think?

Base coat: Sally Hansen Diamond Strength Hardener
Base color: Superstar from Pure Ice - 2 coats
Acrylic paint: Crimson Red from Artist's Loft
Top coat: Sally Hansen Insta-Dri Anti-Chip Top Coat

These were taken with the flash because it picked up the red the best


I hope you like these!

For more NailAween Nail Art mani's feel free to look at these other blogs!

Check out all of the NailAween Nail Art Artists!

datyorkLOVES