Showing posts with label layering. Show all posts

Friday, January 4, 2013

31 Day Challenge - Day 3: Gold

       Three days into the challenge and I'm already posting a day late!  So not how I like to be, but yesterday was a fluke.  I ended up having to work 5 am to 5 pm without a lunch, come home and shower, then go immediately to a friend's house for dinner.  I would have rescheduled except for the fact that we were in charge of bringing the ingredients and their car was broken down.  I very well couldn't leave them stranded like that, could I?!  
     As the title to this post states, yesterday's challenge was gold.  I was kinda freaking out about gold day because I have two gold polishes, or so I thought.  Turns out I had between 15 - 20 gold polishes I had never worn.  I am not a huge gold fan so I never wear it, but for some reason I buy it?  Can you explain this to me?  I guess that is what classifies my "hobby" as an "addiction".  Lol.  
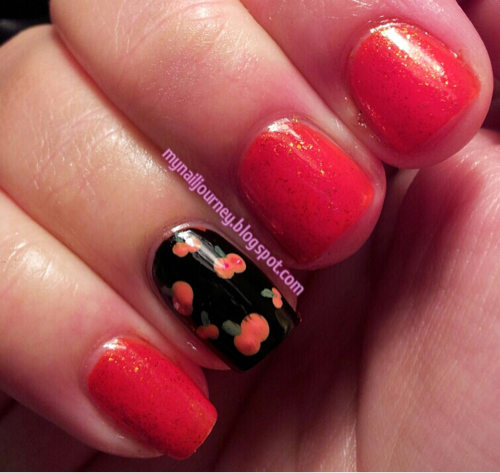
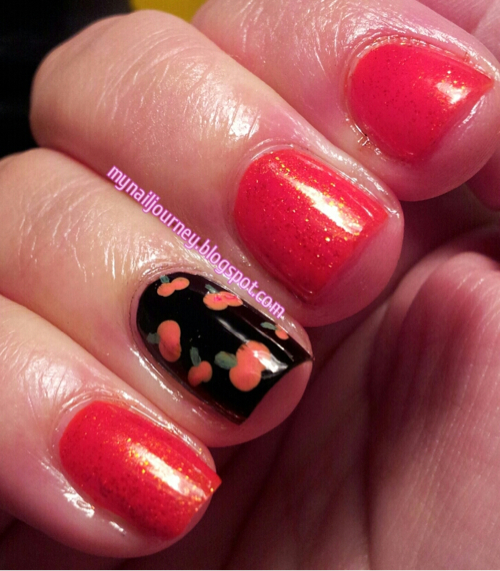
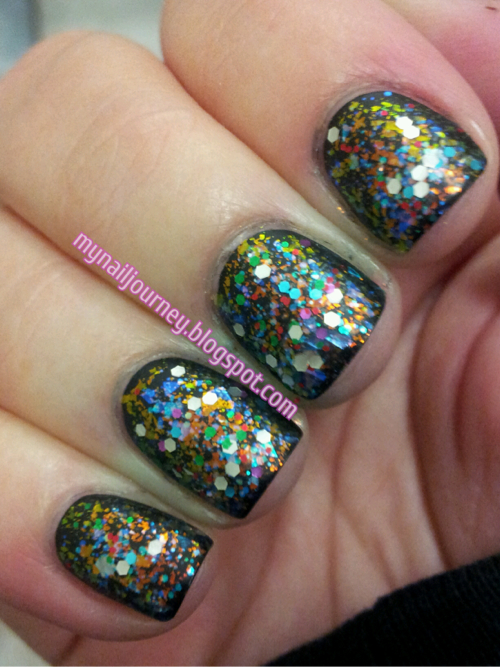
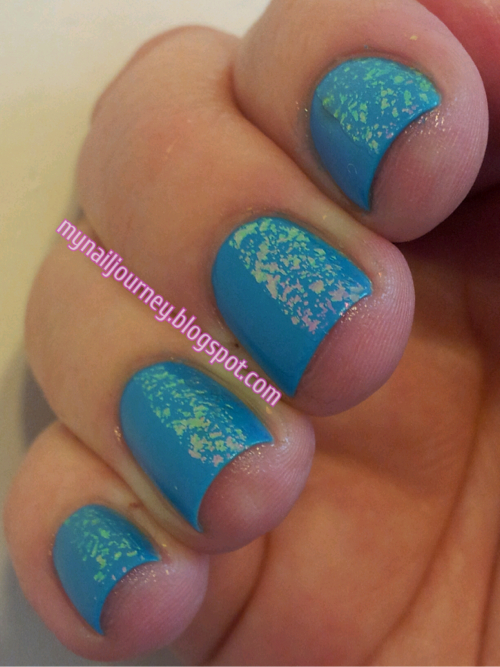
     I loved Disco Dolls.  It has so many pretty colors jam packed into one polish.  I know that this is one coat over a base color, but I dare say it would be opaque with one coat.  To achieve this look I painted on Venus and let it dry completely which took about an hour.  Then one by one I taped off each finger, painted on Disco Dolls, and promptly removed the tape.  Had I used a coat of Seche on top of Venus I could have cut my dry time down to about 30 minutes, but it was my day off and I was watching a movie, so I wasn't it a big of a hurry. :-)

Base coat: Pro FX Fiberized Ridge Filler
Base color: Venus from Avon - 2 coats
Glitter: Disco Dolls from Nicole by OPI - 1 coat
Top coat: Seche Vite


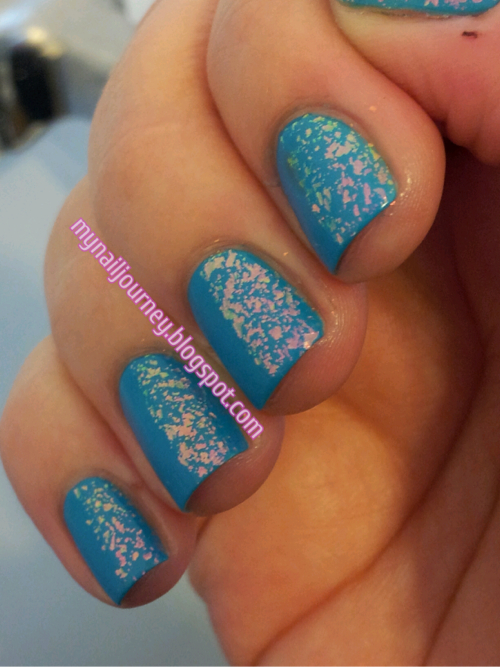
All these pictures were taken outside without the flash.  Here is a close up of Disco Dolls so you can see all the different glitters in this amazing polish.


Have you guys ever been surprised by the amount of one polish you had that you didn't even know?  

Normally I post the little links so that you can view everyone's posts for the challenge, but I can't seem to be able to get them to work! :-(  I'm so sorry because I love adding this feature to my posts.  Once I am able to figure it out, I will add it to each post!

Wednesday, November 14, 2012

Llama Nails Presents the ABC's of Nail Art: J is for... Jelly Sandwich

       Happy Wednesday everyone!  How has your week been?  I am feeling so much better after my bout of strep.  This week's letter for the ABC challenge in the Facebook group, Llama Nails, is J.  I decided that I would do a jelly sandwich mani today.  If you aren't sure as to what a jelly sandwich mani is, don't fret.  It is pretty much what it sounds like.  Glitter sandwiched between a jelly finish polish.  A jelly finish polish is a very sheer polish that looks like jelly, for lack of a better term.  This is not to be confused with a sheer finished polish.  If my lame description confuses you and you want a far better one you can check out this blog.
     I have done three or four of these manicures and this is the first one that I have really liked.  The hardest part of this mani was photographing it.  I took almost 200 pictures and think I got some good ones.  I am hoping to be able to purchase a new camera with my Christmas bonus, but I do have to pay my bills first.  Here's hoping they feel sorry for me this year and give me a little extra! :-)

Base coat: Sally Hansen Triple Strong Advanced Gel Nail Fortifier
Base color: Daddy's Girl from Sinful Colors
Glitter: Let Me See Your Peacock from Claire's
Top coat: Sally Hansen Insta-Dri Anti-Chip Top Coat
I did two coats of Daddy's Girl, a layer of the glitter, and one more layer of Daddy's Girl on top of that.


Have you tried a jelly sandwich mani?  Do you like doing them?  What kind of camera do you think I should get?


Tuesday, October 23, 2012

CNT Halloween Nail Art Challenge: Pumpkins

       It is time to post another mani for the Halloween Nail Art Challenge that is being put on by the Facebook group, Crumpet's Nail Tarts.  I threw this mani together at the last minute last night so I don't really have too much to say about it except that I really like the way that it turned out!  I think it is very simple, cute, and different.  All though I haven't looked at everyone else's manis so I could be wrong about the unique look.  I did forget to leave my accent nail blank while painting the orange, so the Black Creme is over a layer of orange, but Wet N Wild's Black Creme is opaque in one coat anyways.  :-)  Napping before mani-ing is dangerous.  ;-)

Base coat: Sally Hansen Triple Strong Advanced Gel Nail Fortifier
Base color: Citrine from Sinful Colors - 1 coat, Black Creme from Wet N Wild - 1 coat
Over Citrine I layered one Layer of Serena and Chloe from Sinful Colors.  I wanted to do both layers in Serena and Chloe but I was afraid it would photograph more red than orange.
Pumpkins:  A mixture of Crimson Red, Lemon Yellow, and Titanium White acrylic paint from Artist's Loft applied with a dotting tool
Stems: A mixture of Viridian acrylic paint from Artist's loft and my franken orange, applied with a small detail brush
Face: Lamp Black acrylic paint from Artist's Loft, applied with a small detail brush
Top coat: Sally Hansen Insta-Dri Anti-Chip Top Coat

Taken inside without flash


Thanks for stopping by and do feel free to leave some comment love, or creative criticism.

Check out the other pumpkin nails below!


Monday, October 8, 2012

SassyNails NailAween Nail Art Challenge: Day 3 - Bloody Nails

     Hey everyone!  Today I am skipping MSMD Monday to get along with one of my nail art challenges.  This one is hosted by SassyNails on Facebook.  I am on day three and today's challenge was bloody nails.  Now, I'm sure you all have seen  bloody nails around, especially around this time of year, and they all seem to be the same to me.  Now this is ok but I really wanted to do something different, so I came up with this idea.
     After I painted a white base on my nails and it dried, I painted on some red acrylic paint, waited about 30 seconds for it to dry a little and then rolled my finger through it to create a bloody finger print effect.  I think that this turned out pretty cool.  I went to clean up the mani but decided it looked much bloodier if I didn't.  What do you guys think?

Base coat: Sally Hansen Diamond Strength Hardener
Base color: Superstar from Pure Ice - 2 coats
Acrylic paint: Crimson Red from Artist's Loft
Top coat: Sally Hansen Insta-Dri Anti-Chip Top Coat

These were taken with the flash because it picked up the red the best


I hope you like these!

For more NailAween Nail Art mani's feel free to look at these other blogs!

Check out all of the NailAween Nail Art Artists!

datyorkLOVES


Wednesday, September 19, 2012

ABC Nail Challenge: B is for... Book

     Today marks another installment of the ABC Nail Challenge.  If you couldn't tell from the title, today's letter is B!  I have wanted to do a mani based on the cover of the book that I have been reading since I started reading it a few weeks ago, and let me tell you, it was really hard to hold off and wait to do this!  But I used this adult thing called control, which trust me, I fail at all the time, and I patiently waited for the B challenge to arrive.  I am really pleased with how this turned out and I hope that you like it as well!


Base coat: Sally Hansen Diamond Strength Hardener

Base color: Mellow Yellow from Sally Hansen Hard as Nails Xtreme Wear - 2 coats

Top color: Sassy from Revlon

Top coat: Sally Hansen Insta-Dri Anti-Chip Top Coat

Technique: Saran Wrap Method


All these pictures were taken inside without flash


Someday when I'm all grown up I WILL be able to free hand a dragon on to these but for now this will have to do.  I think these match really well, what about you guys?  


If you have a few moments, feel free to check out some other B mani's using the links below.  Have a great day!


Friday, September 7, 2012

Glue Base Coats for Glitter Manicures: How Effective Is It?

     Today's post is my attempt at using Elmer's School Glue as a base for glitter polishes.  If you are thinking, what the hell is this lady talking about, I really think you HAVE to read LabMuffin's blog post.  Did you read it?  Don't lie.  Just do it.  It is fast and easy and you will thank me.
     Ok, now that you have read Lab Muffin's blog post, I feel it is of dire importance that you also check out this blog post from Pretty Purple Polish, where she showed me that I really needed to try this.  She did a 5 day wear test of not only the glue as a peel of base, but also included different base coats and orders of application to show which way worked the best for her.  Now, you may be wondering why, with this wealth of knowledge, I feel the need to share my experience with you.  Let me tell you my story.
     I wash my hands a lot.  And when I say a lot, I mean probablly somewhere close to 100 times a day.  No, I am not a germaphobe, but I work in food service.  My hands are constantly in and out, in and out, in and out of water.  My hands crack, bleed, chap, and hurt.  But at least you know I won't make you sick!  (It takes a lot for me to have my hands picture ready for you guys).  I knew that I would be a perfect test subject for this new phenomenon.  I honestly didn't think that it would work.  I wish that I could tell you guys that it was great and that I will be doing this all the time, but I can not say that.  :-(  With in four hours my polish was gone from three fingers.  Before my shift was over, it was completely gone.  I am so sad that I can't use this method because it really does just peel right off.  I was uber, uber careful like Lab Muffin said to be.  I made sure there was no glue what so ever touching my skin, but it still didn't help.
     I will however say that I may have gotten a little carried away with the amount of glitter and top coats that I used, which could of had a harsher effect on the outcome of my testing.  I may have to try this again with only one or two layers of glitter and a top coat.  I do, however, plan on using this method when I do swatches.  It will be fantastic to remove the polish within a minute rather than 15.

Base coat: Elmer's School Glue
Base color: Black Cream from Wet N Wild - 1 coat
Glitter- in order of application: Green Ocean from Sinful Colors - 1 coat
Shine of the Times from Essie - 1 coat
Party of Five Glitters from Wet N' Wild - 1 coat 
Top coat: Essence Nail Art Special Effect! Topper - 2 coats

As you can read, a lot of layers.

At least I got a beautiful mani out of this experiment.


All of these were taken inside with out the flash.


And here is my nails on my lunch break. :-(  I didn't want to show my thumb but whated you guys to see how it peeled off.  Side note, my cuticles used to all look like my thumb!  I can't believe how much blogging has made me change my terrible cuticle habbits!


So, have you tried using a glue as your base coat?  What about the glittler removal method?  Do you scrub, scrub, scrub it off, or have you just sworn off glitter all together?  I hope you like this post and feel free to comment, comment, comment.  :-)


Monday, September 3, 2012

Blue Me Away! by Sally Hansen and Shine of the TImes Tape Mani

     It is time for another installment of Monkey See, Monkey Do.  If your new to my blog and have never heard of this, it is where a group of us, Crumpet's Nail Tarts, recreate mani's we see around the web, (usually from Pinterest or Facebook,) and post them on to our blogs.  I found the inspiration for today's mani on Victoria's Nails Blog.
     I kinda did something stupid and used Blue Me  Away! from Sally Hansen, which has a glossy finish, instead of just opting to use Phoebe from Zoya, which is already a matte polish!  Ugh.  I didn't think about this until I had to redo my pointer finger for the THIRD time due to being impatient!  Oh well.  Live and learn, right.  When I applied Shine Of The Times, I used to tape to make sure I got straight lines. :-)  I love me some straight lines.


Base coat: Sally Hansen Diamond Strength Hardener

Base color: Blue Me Away! from Sally Hansen - 2 coats

Flakie: Shine Of The Times from Essie

Top coat: Nail Art Special Effect! Topper from Essence - I did not apply this over Shine Of The Times


All pictures were taken inside with out the flash


Can you tell that I didn't use tape on my pointer finger?  I pretty much gave up.  :-(  What do you guys think of this?  If you want to see some more Monkey See, Monkey Do mani's, check out these other blogs.


(Submissions close in 6d 7h 19m)
Link tool by inlinkz.com

Tuesday, July 24, 2012

Gradient Manicure

  Today's challenge in the Facebook group, The Purple Crumpet Fairy Challenge was to create a manicure with red, orange, and yellow.  I hadn't done a gradient in over a month so I figured today would be a great time to do another one.  I just love the way that gradients look.  As soon as I was done with this manicure i went to get some dinner.  I handed the employee my money and she stated that my nails were freaky.  :-|  Now, I'm not sure if she just didn't know what to say because she had never seen a gradient manicure before and was just set back at my awesome talent, ;-) or if she generally disliked them.  I am hoping she was just in shock and awe mode, but you never know.  I will let you guys be the deciding factor to that.
 One thing that I struggled with the last time I tried this was parts of the make up spounge staying on the nail.  A few other people I know had experienced this issue as well.  Someone mentioned that if you got your spounge wet before doing your gradient you would not have this issue, and guess what, they were right!
  If you haven't tried a gradient manicure before you can follow this tutorial from The Nailasaurus.

Base coat: Nail Envy from OPI and Sally Hansen Hard As Nails Hardener
Base color: Lightning from Sally Hansen - 1 coat  I still LOATH the Insta Dri formula.  If you don't know why you can read my blog post on it here.
Orange: Clementine from Sinful Colors
Red: Energetic Red from Sinful Colors
Top coat:  Sally Hansen Insta-Dri Anti-Chip Top Coat

I wish I would have chose a darker red so that it showed up more.  It is pretty hard to see the three colors in this mani.


So, what do you think of my freaky nails?

If you would like to see some more red, orange, and yellow manicures from the other great ladies in my Purple Crumpet Fairy Challenge, you can see their blogs listed below!  Feel free to check them out.

List of girls taking part in Summer Challenge - maybe not every day, but definitely participating


Debbie @ The Crumpet - http://thecrumpet.blogspot.co.uk/

Neivys - http://maquiclubgirl.blogspot.com/

arlene @ http://euzefelus27-nailart.blogspot.com/

Helena - http://nailwish.blogspot.com.es/

Cuti-CLUE-les - http://cuti-clue-les.blogspot.com/

Katee - http://www.agirlandherpolish.com 

Alyssa at Fancy Phalanges - http://fancyphalanges.blogspot.com/

Misha - www.enigmatic-rambles.blogspot.com

Melissa - http://www.misadventuresofawannabemartha.com/

Laurie http://dressedupdigits.blogspot.com/

Lucie @ Lucy's Stash www.lucysstash.com

Jane- http://absolutevarnish.blogspot.com/

Amber www.nevernakednails.blogspot.com

Vic @ Glowstars http://glowstars.net

Jackie- http://memasmanis-jackie.blogspot.com/

Rychelle @ Colorsplash Nails- http://colorsplashnails.blogspot.com/

Stella - http://mywetnails.blogspot.com

Missy @ http://missysmanis.blogspot.co.uk/

Kim @ http://apolishedaddiction.blogspot.com/

Angie @ http://ourpaintedworld.wordpress.com

Bazzia @  http://polishmymind.blogspot.se/

Missy the Manicured Maniac @ http://melissahenderson95.blogspot.com/

Michelle @ http://lacquerorleaveher.blogspot.com/

Nikki @ http://www.lilgreenheart.blogspot.com/

Elizabeth @ http://nailpolishismycrack.blogspot.com/

Ana Cris @ http://www.estacerradaladrogueria.blogspot.com.es/

Shayleen @ http://simplyhandyallyear.blogspot.com/ 

Dina @ http://secretarysnailart.blogspot.no/

Nayade @ Toxic Vanity http://www.toxicvanity.com

Karen @ http://nailsbykaybel.blogspot.com

Kelly (aka Nail Obsessed) @ http://crazynaillady.blogspot.com

Noniq @ Noniq Diary http://noniq.blogspot.com

Marce7ina - http://marce7ina.blogspot.com

Courtney - http://cute-iclechronicles.com

Chrisie @ http://fingersandtoads.blogspot.com

Emily @ http://emily-nailtailes.blogspot.com

Candace @ http://lifeaskandistar.blogspot.ca/

Charis @ http://xarisc.blogspot.com/


Sunday, July 8, 2012

Adventures In Stampinig Sunday Challenge, Sally Hansen Insta Dri Lightning Swatches and Review, and Stamping With Mash Plate 43

  Sorry for the crazy long title but I like to make sure I'm thorough.  Our challenge in the facebook group, Adventrures In Stamping, was to do something we loved.  It could of been a polish, a stamp, a method, anything we loved.  I was at a standstill.  There are so many things I love.  I tried something with OPI's Russian Navy, but then I decided how much I loved Revlon's Whimsical.  I was going to do it over Sally Hansen's Mellow Yellow like I have posted before, but decided I would try the new Sally Hansen Insta Dri in Lightning that I picked up yesterday.
  I had a TERRIBLE nail day yesterday.  I have never wanted to throw all my polishes out the window so badly before.  I am not sure what it was but I really disliked the Insta Dri formula and brush.  I hate saying this because generally I LOVE everything Sally Hansen.  But this is the second product I am not pleased with.  The first would have been the Acrylic Top Coat, but that is an entirely different story.  The brushes in this polish have never bugged me before in other polishes but I don't know why I detested them all of the sudden.  I think it had to do with the thickness of the polish and me being exhausted.  The heat really takes all of my enerygy.  I feel bad complaining about the heat because we have been so lucky compared to the rest of the States.  It has only been over 90 a few days here.  I know, I know, pathetic, but I can't help it.   
  The formula was thick and clumpy.  I tried to do one coat like the bottle suggested but it was so thick that it bubbled.  I removed it all and tried to do two thin coats, and it still bubbled and clumped up.  I also tried to switch the basecoats I used thinking the Avon Smooth Beginnings I always use is almost empty and thought it may have been to thick.  The only reason I am not throwing the two Insta Dri polishes I own is because they are great for stamping, ironically enough, due to their thick formula.  Oy vey.  lol.
  Warning, thiese pictures are terrible.  My cuticles are a disaster, I jammed my pointer finger into something and had to cut my entire nail down, I didn't get very good pictures, I was just done by the time I finished this mani.  

Base coat: Sally Hansen Hard As as Nails Hardener
Base color: Lightning from Sally Hansen Insta Dri - 2 coats
Stamp: Mash 43
Stamping colors: pinky - Heat Flash from Sally Hansen Insta Dri
                            ring finger - Clementine from Sinful Colors
                            middle finger - Why Not from Sinful Colors
                            pointer finger - Let's Talk from Sinful Colors
Top coat: Sally Hansen Insta Dri Anti Chip Top Coat

Finished mani outside in indirect light


Taken inside without flash


One coat of Revlon Whimsical over Lightning in indirect light


Outside in direct sunlight.  Can you see it bubbling on the middle and pointer finger?


Look at how lumpy the formula is on my middle finger!


Outside in indirect light


Taken inside without flash


Inside with flash


I really hope I have a better nail day today.


Friday, June 29, 2012

Sally Hansen Complete Salon Manicure Black Platinum Review and Swatches with Spoiled I Got A Confection To Make

  Sorry for the crazy long title, I just like to be a little thorough. :-)  As I mentioned yesterday, I had been very busy at the beginning of the week helping my friend with her two little children as she is recovering from surgery.  I didn't have any time on Monday but I had about an hour and a half between work and heading over to help her on Tuesday.  Instead of sleep I decided to try the Complete Salon Manicure polish I received from Jennifer last week.  Jennifer was my "adopt a friend" for the month of June.  If you would like to learn more about that you can read yesterdays post here.
  I was not quite sure what the Complete Manicure Salon included so I headed over to the Sally Hansen website and was shocked with what I found out.  The formula in the Complete Manicure Salon has your base polish, nail strengthing formula, growth treatment, color, and top coat!  I thought it only had the base coat, color, and top coat.  Five steps in one and I was short on time, I couldn't beat that.  The dry time was impeccable!  The first layer dried so quickly.  The second and third coat took a little more time, I would say about five minutes but that was quite all right with me as I have waited up to fifteen minutes for colors to dry.  The only thing I did not like about the polish was how sheer it was.  I did however receive full opacity at three coats so it was a minor set back.  
 While I was at my friends house helping her later that night, I noticed she had two polishes from the line sitting on her counter.  I opened them to check the formula and they were a rich, creamy color.  I was glad to find out that it was just the color that I got, and not the entire line.  The brush could easily cover the entire nail in one swipe, but I prefer to do smaller stokes since I feel I have more control of how the color is applied.  I am pretty sure they are going for speed with this line of polish, so a one swipe brush fits perfectly with that concept.
  I also received I Gotta Confection To Make from Jennifer in the same Adopt A Friend swap and since my mani dried so fast I decided to add some sparkle to it.  I freaking love this glitter.  I thought it was just silver glitter suspended in a pink base, but I was wrong!  (I seem to have issues with glitters.  You can see I made the same mistake with UFO.)  It is packed full of multi colored glitter and it made me so, so, so happy.
  The next morning I decided I wanted to do even more to this and I thought, what better way to try out my matte top coat.  I applied it and I fell in love!  Now, I really am not one for mattes, but every now and then I like them.  I think I liked it on this one because it brought out the glitter that much more.  Ok, enough blabbing, here you go!

Base coat, color, Top coat of swatches:  Black Platinum by Sally Hansen - 3 coats
Glitter: I Gotta Confection To Make by Spoiled - 1 coat
Top coat: Out the Door
Matte top coat: Nail Art Special Effect! Topper by Essence


Here it is matteified


Here it is with the glossy top coat over it


And now for the swatches
Taken outside in direct sunlight


Upclose in direct sunlight. I am including this to show the micro
shimmers that appear in the Black Platinum.  I didn't even notice
them until after I took this picture. 


Outside in indirect light


Inside with flash


Inside without flash


  Oh, and one last thing.  This lasted me two days without chips.  In my industry that is a freaking miracle.  I usually can't make it half way through my shift before my mani chips!
  So, have you tried any of the Complete Salon Manicure Line?  What did you think?


Friday, June 1, 2012

Sinful Colors Let's Talk Swatches and a Special Glitter


  Hey everyone.  So I have been having technical difficulties with my lap top so I am trying out a new app on my ipad and I really hope that it works because it seems like a very cool app.  I purchased Sinful Colors Let's Talk last month and really wanted to play with it.  Let me start out by saying this is an IMPOSSIBLE color to photograph.  It is an amazing purple but once you put a camera over  it it appears blue!  I tried adjusting every setting on my camera, taking pictures in every possible light source, and even charged my camera battery over night and tried taking pictures with that.  Sad thing is my phone has a better camera than my digital camera.  :-(  Pictures can't describe what this color is so I just suggest you go out and buy it.  The combination that I came up with for this mani is now one of my all time favorite mani's.  I will be wearing this for more than one day.
     Second most important thing to note about this mani.  I did no touch ups!  I am getting better at not making my nails look like my friends two year old drew chalk pictures all over the side walk!
     And the third most important thing about this mani is the glitter that I applied.  My friend Tina started making her own polishes.  When I saw this one I knew I had to have it and forced her to sell it to me.  It is a one of a kind and you can't have it!  Neiner neiner neiner.  Ok, ok, sorry, but I just love this glitter combo so stinking much.  It has blue micro glitters with pink, silver, green, and blue hexagonal glitter and I love it!

Here is the finished product.  It took me about 50 pictures to get one that somewhat showed the purple of Let's Talk.


I am only showing this picture so I can show you the prettiness of the glitter top coat.  


Here is a swatch of Let's Talk in side without flash.  As you can see it appears to be blue.  It is kinda fun to hold the camera up to the nail, see it blue, and then move the camera out of the way and it be purple.  It is kinda like a magic show.  lol


 This image is not mine.  I got it from Polish Etc blog.  I just could not for the life of me catch the beautiful purple that this is on my camera.


Isn't the purple just so pretty!  I LOVE everything about this mani!!
Base coat: Chip Skip and Nail Envy from OPI
Base color: Let's Talk from Sinful Colors - 2 coats
Glitter: Just For Me from Polish Plus - 1 coat
Top coat: Out the Door

Also, I really hope this post looks good because I have spent about 5 hours on it trying to figure out how to use the damn Ipad app!!!