Showing posts with label Essence. Show all posts

Thursday, December 27, 2012

N is for ... Navy, Russian Navy

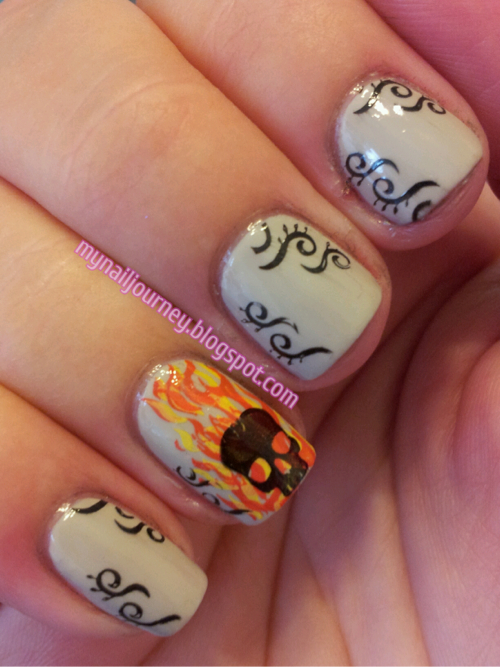
       Why hello there fellow nail art enthusiasts.  I have been MIA for a few weeks, but have no fear, I am here!  I didn't stop doing my nails, I just needed some time away from the blog-o-sphere.  I'm not going to lie, I was a little disappointed with the amount of feedback I received on my last blog post.  I worked so hard on that Minnie, and it didn't seem to spark much interest!  After sulking for a while, I decided it was time to jump back in to what I love to do and not care about the comments and such.  Of course that means that my "N" challenge for the Facebook group, Llama Nails is a little late, but what's that saying ... better late than never?!
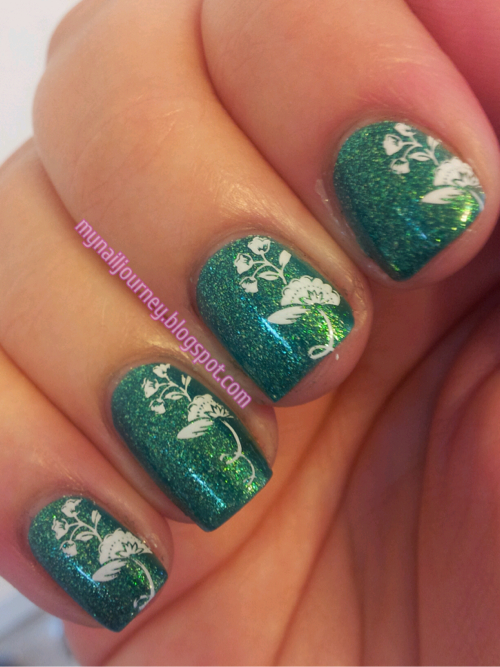
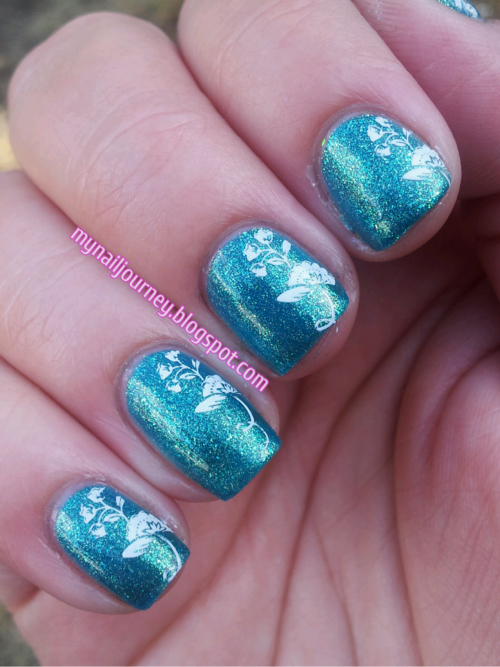
     I have worn this color so many times and never been able to capture its beauty until today.  I was so excited when the sun was shining after work today that I ran into the house and started to do this mani, again, so that I could show you the beauty that is Russian Navy.  This was on my wish list for so long, and it does not disappoint, well, unless there is no sun! :-)

Base coat: Pro-Fx Fiberized Ridge Filler
Base color: Russian Navy from OPI - 2 coats
Accent nail: White on the Spot from Milani -2 coats
Top coat: Seche Vite
Stamping color: Sapphire from Kleancolor
Stamping image: Unmarked plate from Essence

All pictures were taken in direct sunlight


I wish it wasn't so hard to show the beauty of Russian Navy, but oh well, it's worh it.  How was your Christmas?  Did anyone get any polish in their stockings?


Sunday, November 25, 2012

Stamping With Mash 42 Over Sinful Colors Gradient

       Happy Sunday everyone!  I am typing this with one hand because I have a baby on my lap!  But it is OK, because he is the cutest baby on the face of the earth, and my best friends baby.  Although, I'm sure mine will be cuter. ;-)  Today's post is for the Facebook group, Adventures In Stamping.  Each week we vote on a challenge, and this week the challenge is for us to stamp over a blue base.  I decided I wanted to do a blue gradient and it turned out beautifully.
     I also thought today would be a great way to use some of my whites that I haven't tried stamping with, to see how they worked.  We get a lot of questions referring to cheaper polishes to stamp within the group, and I figured my left hand would be a great way to kill two birds with one stone.  As you will see, my cleanup is terrible with my non dominant hand, and I'm also hiding a brutal hangnail.  It is so brutal, I couldn't even apply acetone to it to clean it up.  :-(  Winter is so harsh on my hands!

Base coat: Sally Hansen Triple Strong Advanced Gel Nail Fortifier
Base color: Cinderella from Sinful Colors - 2 coats
Gradient colors: Cinderella, Why Not, and Hot Spot from Sinful Colors
Topcoats: Sally Hansen Insta-Dri Anti-Chip Top Coat and Essence Gel Like Top Coat
Stamping colors: Stamp Me! White from Essence, White On The Spot from Milani, and Superstar! from Pure Ice
Stamping image: Mash 42

This picture was taken outside.  All stamping is done with Stamp Me! White from Essence


This picture was taken inside without flash.  All stamping was done with Stamp Me! White from Essence.


This picture was taken inside without flash.  Stamping was done with White On The Spot from Milani on the pointer and ring finger, and Superstar! from Pure Ice on the middle and pinky finger.


This picture was taken outside and stamping is done as described above the previous picture.


As you can see, the difference is pretty dramatic between the three whites I stamped with.  I will keep using the stamping polish from Essence, unless I can find something better.  I know the last two pictures look fuzzy, but it is actually the stamping that is making them look fuzzy. :-(  Crazy, huh.


Monday, November 12, 2012

Stamping With Mash Plate 49 Over Avon Strawberry Polish, and Black Shatter from OPI

       Happy Monday everyone.  Let me just be honest and say that I am so glad it is a new week.  Last week sucked ass!  I had PMS all week and on top of that came down with Strep Throat!  I am sure that my PMS was on high from the Strep, too.  We spent all of our grocery money on the doctors visit, but oh well.  What can you do.  Looks like we will be on a steady diet of what ever is in our pantry, which isn't much!  Won't be the first time we've had to do this, and I'm sure it won't be the last.  
     Today was the first day I have had energy since Thursday.  I went to bed at 4 on Thurdsday and slep until I went to work at 5, worked a half day on Saturday, went home sick, noticed my throat was white, went to the doctor and then slept. I was so mad that I had to miss the Monster Truck show.  My parents pre bought my husband and me tickets since we couldn't afford them, and it was the first year in five years that I didn't have to work this particular event.  Imagine my anger.  Good thing I was too tired to do anything about it.
     Enough about my crap weekend.  On to the more important things in life, my nails!  I saw this mani that Valiantly Varnished did I was so excited to use it.  As I was looking through my polishes the other day I almost threw out my crackle because let's face it, no one uses them anymore.  But her mani did and i fell in love with it.  I am going to play around with this idea until I finish off my bottle of crackle, so weather or not you like this mani, be prepared to see some more like this. :-)  I hadn't used my crackle in so long that I actually had to use thinner in it!  And yes, it works just fine.

Base coat: Sally Hansen Triple Strong Advanced Gel Nail Fortifier
Base color: Strawberry from Avon - 1 coat
Crackle: Black Shatter from OPI
Stamping color: Stamp Me! White from Essence
Stamping plate: Mash 49
Top coat: Sally Hansen Insta-Dri Anti-Chip Top Coat


What do you guys think?  Still hate crackle or could you wear something like this?


Sunday, November 4, 2012

AIS: Stamping With Mash Plate 41

       Happy Sunday all.  I hope that you are all enjoying your extra hour of sleep.  I haven't participated in one of Sunday's Stamping Challenges in the Facebook group Adventures In Stamping in a few weeks now.  Today's challenge was for us to stamp over glitter.  When I was playing with some of my new polishes last night I came up with this color combination and was very excited to try it out.  It turned out a lot better in my head, but I still really like it.  I hope you do as well.

Base coat: PVA Glue - If you're not sure what I am referring to, you can check out my blog post about it here.
Base color: Skull and Glossbones from OPI - 2 coats
Accent color: Luxe Lavender from Avon - 2 coats
Glitter: Cheatin from Pure Ice - 1 coat
Top coat: Sally Hansen Insta-Dri Anti-Chip Top Coat
Stamping plate: Mash 41
Stamping color: Stamp Me! White and Stamp Me! Black from Essence


This photo was taken inside with the flash


This was taken outside without the flash


Skull and Glossbones is slowly becoming one of my favorite polishes!  I really like the white over the purple.  I think next time I will use all white instead of the black over the glitter and Skull and Glossbones.

Sunday, October 21, 2012

AIS: Halloween - Stamping With Mash Plates 48 and 29 Over OPI Skull and Glossbones

       It is Sunday and that means it is time for another stamping challenge in Adventures In Stamping, a group that I am in on Facebook.  Today's voted on theme was Halloween.  I am getting a little Halloween'd out with all of these other challenges I am involved with and wasn't going to participate until I remembered that I had a skull stamp in my collection that would never be used otherwise.  You see, I am not a skull person.  I don't understand why they are on everything right now, like the mustache.  But, to each their own.  I wasn't even sure how to use the skull in a mani when my husband grabbed the three plates I playing around with and told me what I should do.  The accent nail was his idea, except for the multiple stamping of the flames, and the little squirly q's were my idea.
     I just picked up Skull and Glossbones at T.J. Maxx for $3.99 yesterday and thought it would be perfect for a mani with a skull on it.  Upon further google searches, I am not even close to the only one who thought this was a good idea.  :-)  As described by Scrangie, Skull and Glossbones is a "ghostly light grey cream."  I thought this was going to be a three coater but after the second coat it has reached full opacity.  OPI is my favorite brand of polish and I really liked this more than I thought I would.  The half price price tag helped a lot, too.

Base coat: Sally Hansen Triple Strong Advanced Gel Nail Fortifier
Base coat: Skull and Glossbone from OPI - 2 coats
Top coat: Sally Hansen Insta-Dri Anti-Chip Top coat
Stamping plates: Mash 29 & 48
Stamping colors: Lightning and Heat Flash from Sally Hansen Insta-Dri and Stamp me! Black from Essence
Top coat: L.A. Colors Rapid Dry Top Coat

Taken inside without flash


This is how I came up with the little curls on the sides of each nail


I hope you guys enoy this!  Feel free to comment, I read each and every one of them.  They make me  happy!

Saturday, October 6, 2012

Sat-ART-day Challenge: Tarts

     Hey everyone!  Today marks the start of a new art challenge!  Debbie Crumpet, owner of the Facebook group, Crumpet's Nail Tarts, decided to start a new challenge since our summer one ended.  I only participated in a few days of the summer challenge because I joined about half way through.  I also didn't know how fun they were!  The thing I love about a group challenge is seeing the variety of nails people can come up with for one theme.
     Today's theme was... tarts.  I know, I know, right?!  What the hell!  Debbie posted this in the beginning of September, ( I think) and I brainstormed the entire month!  I almost didn't participate but I figured, what the hell, it is a challenge for a reason!  Off to google I went.  Turns out there are two definitions for a tart.  One, "a small pie containing fruit or the like,"  and two, a "prostitute or promiscuous woman. " Both definitions come from the dictionary.  So, if you're anything like me, your jaw just dropped.  You know it did.  How the hell am I supposed to draw a pastry on my nails!  I sure as hell wasn't going to put prostitutes on my nails!  Welp, I believe I solved the problem.  As soon as I was done with these, I asked my hubs what was on my nails and he guessed on the first try, so I figure they can't be that bad, right?  Hopefully you can guess as well.


If you guess strawberries, you're wrong!  They're blueberries!  I am very pleased with how this turned out and I hope that you were able to guess what they were.

Base coat: Sally Hansen Diamond Strength Hardener
Base color: Audrey from Zoya - 2 coats
French tip color: Superstar from Pure Ice
Blueberries:
 light blue - Vintage Blue from Avon
 dark blue - Why Not from Sinful Colors (both applied with a dotting tool)
  stems - Scream from Pure Ice (applied with a small brush)
Top coat: Sally Hansen Insta-Dri Anti-Chip Top Coat

If you're curious as to how others approached this tart challenge, check out these other blogs!

Thanks for stopping by and feel free to comment! :-)


Friday, October 5, 2012

Sassy Nails Nailaween Challenge: Day 2 - Matte Doticure

     It is time for me to post day 2's post for the Nailaween Nail Art Challenge.  There are 10 topic in this challenge and the one thing that I love about this is that it is self pace.  We have until October 31 to post all of our manicures.  This works great seeing as how I am in like a gazillion challenges this month...  Not to sure why I did this, but oh well.  It is keeping me busy and I like it.
     The second day of this challenge is to produce a matte doticure.  I was really excited for this one because I have wanted to do a doticure like the one I am showing you for quite some time.  I am so let down with how this turned out.  I had such high hopes and it wasn't what I wanted.  It would have worked if I had a more opaqe orange, but this one would barely show up on the black so I ended up having to use a white base, only for the dots that are overlapping the black, and you can tell that it isn't right.
     I applied the black over the orange using the tape method. After the black dried I went in and added the dots with a dotting tool to give it the interlocking look.

Base coat: Sally Hansen Diamond Strength Hardener
Base color: Citrine from Sinful Colors - 2 coats
Black: Black Creme from Wet N' Wild
Top coat: Essence Nail Art Special Effect! Topper


Taken inside with flash


Taken inside without flash


Well I hope that you like this even though I don't. :)

Feel free to check out these other ladies blogs who are partcipating in this challenge.

Check out all of the NailAween Nail Art Artists!

datyorkLOVES


Sunday, September 23, 2012

Adventures In Stamping: Mash 28 Over Essence Choose Me!

     Today's Sunday Stamping Challenge for the Facebook group, Adventures In Stamping, was to have someone else pick our stamping plate.  Last night I handed my hubs my basket of plates and asked him to pick a design for me to use.  He surprised me by asking me what colors I was going to use, and was really into it.  Such a good hubs.  Don't worry, I return the favor by telling him how much I love his cool car.  ;-)  He chose two flower images and a nautical star.  I laughed and told him to pick just one, because how the hell am I supposed to mix a nautical star in with flowers?
     I used Choose Me! from Essence for the base color.  This is such a pretty duo-chrome.  I included indoor and outdoor pictures so you could see the beautiful shifts in this color.

Base coat: Sally Hansen Diamond Strength Hardener
Base color: Choose Me! from Essence -2 coats
Stamping color: Stamp Me White from Essence
Top coat: Sally Hansen Insta-Dri Anti-Chip Top Coat


Taken inside without flash


Taken outside without flash


So, did my husband do a good job picking out the plate?  I think so! 


Wednesday, September 12, 2012

ABC Nail Challenge: Anchor Stamping

     Today marks the start of a new challenge.  Our summer challenge has come to an end, (all though I was a TERRIBLE participant) and a new one is beggining.  It is called the ABC's Challenge.  I am excited to do this!  Each Wednesday we will be working on one letter of the alphabet and doing a mani that starts with that letter.  Example: A is for Avon, and using an Avon polish, or B is for Bee and stamping with a Bee, etc, etc.  Hopefully you get the picture because I am terrible at explaining stuff like this.
     I had my whole A mani planned out, even consulted with the hubs about it, and as I was searcing through my plates I found one from Essence with an anchor on it.  The light bulb went off.  A is for anchor!!  So off I went to do an anchor mani.  I REALLY need to work on my patience when it comes to stamping.  I also need to remember that my Sally Hansen top coat is not Seche Vite, and if it is applied in the same manner it WILL bubble!  Ugh.  Oh well.  As much as I want to be perfect, no one is.  Except Chalkboard Nails...


Base coat:Sally Hansen Diamond Strength Nail Hardener

Base colors: White - French White Tip from N.Y.C. - 3 coats

                     Blue - Smooth Sailing from Essie - 2 coats

                     Red - Ruby Slipper from Avon (also used for the half moons)

Stamping colors: Stamp Me! White from Essence

                            Blue - Why Not from Sinful Colors

Stamping plate: not numbered from Essence

Top coat:  Sally Hansen Insta-Dri Anti-Chip Top Coat


Taken inside without the flash


Well, what do you think?  If you have some time you should check out these other A mani's...


(Submissions close in 175d 7h 45m)
Link tool by inlinkz.com

Tuesday, August 28, 2012

Flip Flop Mani

     Today's challenge mani topic was flip flops.  I was a little sad when I read this because I don't have the cute stamp that everyone has with the flip flops on it and I wasn't very inspired because I only have flip flops with a straight color, not a cute design on them.  I was just going to do a skittle mani with all of the colors of flip flops I own, but then I remembered how I wanted to paint the designs from my pedi bag onto my nails.  It was the perfect idea!

See, flip flops!  The bag is very sheer so here is a picture of one of the bottles of products that comes in this uber cute bag.


Base coat: Sally Hansen Diamond Strength Hardener
Base color: Glazed Pearl from SXY by Unforgettable Moments - 2 coats
Pink: Pink Friday from OPI
Green: I Need a Refresh-Mint from Wet N' Wild
White:
     Straps on flip flops: White from Kiss Brush On Nail Art Paint
     Flowers on flip flops and dots: French White Tip from NYC
     Stamped flowers: Stamp Me! White from Essence
Stamping plate: Mash plate 35

As I am sure you will be able to tell, the green and pink flowers were done by hand.  I used a dotting tool to do these and the random dots that are all over.  The white flower on my middle finger was the only one that was stamped on to my nail.

Taken inside without flash


So, what do you think of my recreation?


Tuesday, August 21, 2012

Tape Mani and Doticure With Matte and Glossy Finish

     Hey guys.  I'm back from another 80 hour work week and my cuticles are proof of that.  They look like total crap!  Ugh.  It is so frustrating.  I will definitely be giving them some TLC this week.  The inspiration for today's manicure came from this post on Chloe's Nails.  I pinned it on Pinterest a few months ago and needed some inspiration yesterday.  Once I saw this I thought, hey, I can do that!  If you haven't visited Chloe's Nails I highly suggest you do because she is one of the biggest nail bloggers out there, (that I know of) with over 9000 friends.  She has not been blogging for a few months due to spending the summer with her kids but I have my fingers crossed that she will return soon.  I love all of her manicures.
     I was so in love with this mani until... I applied my top coat.  I should have listened to my gut and opened my new one but I thought, no, I don't want to waste my money, I will just use what is left in this bottle.  BAD IDEA!  IT RUINED MY MANI!  It came out completely gloopy, took hours to dry because it was so thick, and because of its thickness, it bubbled when it dried.  I wanted to cry!  I even had to redo one of the nails because it was so thick it just scraped right off.  :-(
     To achive this look I applied two coats of Wet Cement from Wet N' Wild.  I then applied my Essence Nail Art Special Effect! Topper to give it the matte look.  After completely drying I used tape to apply Lincoln Park At Midnight by OPI and then with a dotting tool applied Wet Cement of top of that.  I only applied my top coat to the glossy side of the mani since I wanted the matte side to stay mattefied.  If you need more specific directions on how to do a tape mani, you can view my blog post on it here.


I feel ok about this picture if you only look at my pinky and ring finger.  lol
This was taken inside without the flash


Again, ok if you look at the pinky and ring finger.


I am including this picture because it more acuratly shows the colors.  The colors
are more washed out in the above photos for some reason.  This was after a full day of wear
so I apologize for the tip wear and the huge chip missing from the pointer finger.


Have you ever done the perfect mani and then ruined it by applying your top coat?


Monday, August 13, 2012

OPI Grape...Set...Match Swatches and Stamping With Mash Plate 46

     I picked up OPI's Grape...Set...Match for free!  I am sure that you are asking yourself how by now.  Well, let me tell you.  Because I am such a nail freak enthusiast I follow many other nail enthusiast on Facebook.  When something cool pops up in the polish world every single one of them like to talk about it.  Turns out the website copius.com is kinda like an E-Bay thing.  People are allowed to list, sell, and buy stuff on there and when a new person signs up from someone else's link they get a $10 credit to use.  I actually paid $.59 for this polish because the asking price was $9.99 and of course they threw som $.60 fee in there.  But whatever, $.59 for a new OPI, great, SOLD.  I don't have a link for you guys to follow but if you follow a lot of nail bloggers on Facebook, trust me, you will see tons of opportunities to snag the $10.00 Copius sign up credit from them.
     Grape...Set...Match was released in 2011 as part of the Glam Slam! Collection.  It is a purple metallic duochrome that shifts from purple to blue.  It isn't a very big color shift, in my opinion it is more of a purple metallic with a blue shimmer to it.  Maybe the duochrome effect would be more noticed with three coats instead of two.
     Of course I had to add some stamping to my swatch because plain swatches bore me to death, lol, unless they are the perfect ones that come from Scrangie's blog, of course. 

Base coat: Sally Hansen Hard As Nails Hardener
Base color: Grape...Set...Match by OPI - 2 coats
Stamping color: Stamp Me! White by Essence
Stamping plate: Mash 46
Top coat: Sally Hansen Insta-Dri Anti-Chip Top Coat


Finished product


Taken outside in direct sunlight


Taken outside in indirect light.  The duochrome is most noticible here


Taken inside with out flash


What do you think of Grape...Set...Match?  Do you have it in your collection or did you pass on it last year?


Sunday, July 22, 2012

OPI Black Cherry Chutney Swatches and Stamping With Mash Plate 42

  Today's challenge in the Adventures In Stamping group on Facebook was for us to stamp with our favorite stamp.
I only have about thirty stamping plates so I don't really have a "favorite."  I have stamped with the Mash 42 plate before and really liked the outcome of it, so I decided to use it again.  I think that I like this stamp on the mani that I have linked to rather than on top of Black Cherry Chutney.
 Earlier last week someone had mentioned that they had an OPI Elephantasic Pink up for swap so I decided to look up the swatches for it.  I stumbled across Scrangie's blog post for the 2008 India Collection and instantly fell in love with Black Cherry Chutney, Royal Rajah Ruby, and Yoga-ta Get This Blue!  These colors are so beautiful and I instantly put them on my wish list.  On Friday after work I went to check out my local beauty supplies OPI sale and what do you know, I found Black Cherry Chutney.  My husband didn't seem as excited as I was though.  :-(  I decided to wear it right away because I was catering a wedding yesterday and I love dark colors on my nails, so I figured this would be perfect, and I was right.
I loved this color so much that after it got all screwed up from catering, I painted it on again and that is when I realized that it was time for me to do my Sunday stamping challenge.

Base coat: Nail Envy by OPI and Hard as Nails Nail Hardener from Sally Hansen
Base color: Black Cherry Chutney from OPI - 2 coats
Stamping color: Stamp Me! White from Essence
Stamping plate: Mash 42
Top coat: Sally Hansen Insta-Dri Anti-Chip Top Coat

Finished product


In direct sunlight.  Look at this BEAUTIFUL color!


Another direct sunlight picture, it is just so pretty!


Outside in indirect light


Inside without flash
 

Inside with flash


Sorry for the copius amounts of pictures, but I am in love and I don't care who knows it!!  What do you think about Black Cherry Chutney?  Do you like dark, vampy colors as well, or do you prefer lighter ones?